FIDO2.1 Implementation using the Unifyia Platform - Initial Release


| Unifyia Implementation Guide for Passkeys (FIDO2) | ||
|---|---|---|
| Version Number | Date | Change Description |
| 1.0.0 | December 18, 2024 | First Version |
- Executive Summary
- Scope
- Unifyia Platform
- FIDO2 Passkeys Fundamentals
- FIDO2 Passkeys Implementation Using the Unifyia Platform
- User Self-Issuance of Passkeys
- User Issuing Mobile Credentials on the Unifyia ID Wallet App
- Operator Issuance of Passkeys
- User Authentication Using the Issued Credentials
- Granular Lifecycle Management of the Passkeys
- Glossary
Executive Summary
This implementation guide was developed due to a joint experiment using the Unifyia platform in the GSA Federal Acquisition Service Information Technology Categories cloud sandbox. The Office of Government-wide Policy collaborated with the Unifyia team, providing program and technical leadership support throughout the project. This guide provides a detailed framework for implementing passkeys using external security keys, smart cards, and digital wallets for federal agencies and relying parties. Passkey-based authentication aims to strengthen security, ease the operational burden for agencies, relying parties, and users, and align with modern cybersecurity mandates by enabling phishing-resistant, passwordless authentication. The guide was reviewed in collaboration by a few Department of Energy national labs for quality assurance before publication.
Topics covered within this implementation guide are
- An introduction to the Unifyia platform and its capabilities
- An overview of FIDO2 Passkey fundamentals
- Best practices for implementation
- System configurations required for passkey issuance
- User self-service issuance and lifecycle processes
- On behalf of the user, operator-driven issuance and lifecycle processes
- One-click issuance of multiple FIDO2 passkeys Easily issue multiple passkey credentials on behalf of relying parties, such as Entra ID, Okta, and others, without the need for federation.
- User authentication using the issued credentials
- Comprehensive granular lifecycle management of issued credentials
OMB Memorandum M-22-09 highlighted the urgent need to modernize federal IT infrastructures and protect government systems from growing cyber threats. It paved the way for adopting advanced, scalable, and future-proof identity solutions that are phishing-resistant, secure, user-friendly, and cost-effective. This directive was instrumental in providing federal agencies and enterprises using PIV (Personal Identity Verification), PIV-I (Interoperable), or CIV, Commercial Identity Verification credentials the flexibility to transition to modern, passwordless authentication technologies—such as FIDO2 and Derived Credentials—aligned with Zero Trust security principles.
The shift to remote work, accelerated by the COVID-19 pandemic, highlighted the need for authentication methods beyond PIV-based smart cards to maintain strong security while supporting remote operations. As newer computing devices, especially mobile devices, became prevalent, the use of PIV cards posed significant challenges. NIST Special Publication (SP) 800-157 introduced the Derived PIV (DPIV) credential, built from the primary PIV credential to address these issues. Although DPIV relies on Public Key Infrastructure (PKI) to enable mobile access, it demands substantial infrastructure investment and ongoing maintenance, making it cumbersome to implement. Its adoption is typically feasible only in environments with well-established PKI infrastructure.
For broader, more scalable use cases, simpler and more user-friendly alternatives like FIDO2 passkeys are increasingly favored. These can be deployed as platform authenticators on devices using biometrics, as cross-platform authenticators through external security keys, or within modern mobile wallets.
FIDO2 passkeys and Derived FIDO2 Credentials DFCs are crucial in modernizing government and enterprise security by leveraging cryptographic keys for passwordless and phishing-resistant authentication. FIDO2 compatibility across major platforms including Windows, Android, iOS, macOS, and browsers, including Google Chrome, Mozilla Firefox, Microsoft Edge, and Apple Safari, makes it a robust solution for enhancing security and user experience in digital authentication.
We extend our sincere gratitude to our collaboration partners: the Department of Energy's Sandia National Laboratories and Lawrence Livermore National Laboratory, whose comprehensive technical review and expertise significantly enhanced the quality and reliability of this implementation guide. Their collective expertise and dedication to advancing federal cybersecurity standards have been invaluable in creating this comprehensive framework based on the FIDO2 standard.
Scope
Although the Unifyia platform supports issuing PIV + FIDO2 passkeys across multiple form factors, this implementation guide focuses specifically on passkeys issuance through credential providers and authenticators and digital wallets via the Unifyia ID Wallet app on iOS and Android. The following passkeys issuance use cases are covered -
- User self-issuance of passkeys by authenticating with IDP credentials
- Self-issuance of derived passkeys using PIV credentials
- Provisioning of FIDO2 credentials on behalf of relying parties
- Self-issuance of mobile digital credentials using the Unifyia ID Wallet app
- Operator-driven user enrollment and issuance of passkeys
- Operator-driven issuance of Derived FIDO2 Credentials DFC after PIV credential verification
- Operator issuance of mobile digital credentials on the Unifyia ID Wallet app on iOS and Android
This document does not include detailed system configurations required to support these use cases. However, later sections provide an overview of the necessary configurations.
Unifyia Platform
The Unifyia platform is an advanced, cloud-native solution built on a microservices architecture, offering a unified experience for issuers, holders, and verifiers. As a next-generation zero trust identity and access management system, it facilitates the issuance and granular lifecycle management of various identity types and credentials listed below with a seamless user experience for partners and relying parties.
- PIV - Personal Identity Verification
- PIV-I - PIV-Interoperable
- CIV - Commercial Identity Verification ID
- FIDO2 Passkeys on devices, security keys, or smart cards
- PIV+FIDO2 credentials on devices, security keys, or smart cards
- Mobile credentials, including FIDO2 on digital wallets
- Derived credentials like Derived PIV (DPIV) and Derived FIDO2 Credentials (DFC) on security keys, smart cards, and digital wallets
- PIV+FIDO2+Mobile credentials
- PIV+DPIV+Mobile credentials
- PIV+DFC+Mobile credentials
Unifyia offers comprehensive role-based capabilities for sponsoring, enrolling, issuing, authenticating, and managing identities and credentials for users, partners, and relying parties. This enables organizations to align with the latest FIPS 201-3 standards, NIST SP 800-63-4 Digital Identity Guidelines, and FIDO2 specifications, all within a unified platform. Unifyia also supports the implementation of the Memorandum M-19-17 directives.
The platform enhances scalability, usability, and security by leveraging existing authentication systems and partnering with authentication providers. Key features include:
- Integration with certificate authorities for certificate issuance
- Integration with external credential management systems via REST APIs
- Configurable device profiles for managing device keys
- Directory integration for user federation
- Functionality as an identity broker
- Support for adding identity providers (IDPs) for identity federation using SAML and OIDC protocols
- SCIM (System for Cross-domain Identity Management) services for user provisioning management through OAuth 2.0
- Single sign-on (SSO) configuration for applications via SAML v2.0 and OpenID Connect v1.0
- Passkey (FIDO2) provisioning for relying parties
- Customizable workflows for streamlined identity and authentication management
Unifyia enables federal agencies and enterprises to implement seamless authentication across integrated applications, using credentials from Unifyia, relying parties, or identity providers while leveraging existing authentication infrastructure.
FIDO2 Passkeys Fundamentals
What are Passkeys?
Passkeys, based on FIDO2 standards, replace traditional passwords with cryptographic key pairs, providing a secure, passwordless login experience and strong protection against phishing and other cyber attacks. They rely on two core FIDO2 components: WebAuthn, which facilitates passwordless authentication on websites and apps using public-private key pairs, and CTAP (Client to Authenticator Protocol), which enables communication between authenticators (e.g., USB keys, Touch ID) and web applications.
Passkeys (FIDO2) offer phishing-resistant, passwordless authentication that meets NIST Authentication Assurance Level 3 (AAL3). Users gain seamless access to federal services through issued passkeys stored on devices or hardware security tokens, such as smart cards, USB keys, or NFC-enabled devices. These passkeys eliminate risks associated with password reuse, credential theft, and phishing, making them a key advancement in the future of online authentication and an integral part of the modern digital security landscape.
What are Derived FIDO2 Credentials DFC?
Derived FIDO2 Credentials DFC, also known as DFIDO2 or DFC passkeys, are derived from an individual's existing primary credentials, such as Personal Identity Verification (PIV), Personal Identity Verification – Interoperable, or Common Access Cards. DFCs allow users to authenticate and access secure systems or services without needing a physical PIV ID card. These credentials play a vital role in a zero-trust security framework, ensuring that all authentication events are protected through public-key cryptography.
The issuance of both passkeys and DFC passkeys adheres to NIST SP 800-63-4 and FIPS 201-3 standards, which promote strong multifactor authentication and require cryptographic protection to ensure the integrity and security of sensitive data.
Supported Form Factors for Passkey Issuance
The Unifyia platform supports issuing passkeys in various form factors, accommodating different devices, user preferences, and security needs. Organizations should prioritize ease of use, portability, security, and recovery options when selecting a form factor. The supported form factors generally fall into three categories: platform authenticators, cross-platform authenticators, and digital wallets.
- Platform Authenticators
Platform authenticators are passkeys stored directly on the user’s device. These are tied to a specific platform (e.g., smartphone, laptop, desktop, or tablet) and leverage the device’s built-in security features for authentication. The Unifyia platform enables organizations to store passkeys on mobile devices by using biometric features such as Face ID, Touch ID, and Android Biometrics. Alternatively, device passcodes or patterns can be used. For modern desktops and laptops, the Unifyia platform supports passkey (FIDO2) issuance and storage using TPM (Trusted Platform Module) or secure enclaves, which protect private keys from unauthorized access, ensuring they remain secure on the device.
- Cross-platform Authenticators
Cross-platform authenticators, often called external security keys, are portable devices that store passkeys and can be used across multiple devices. The Unifyia platform supports issuing passkeys (FIDO2) on connected devices like smart cards and security keys through various interfaces, including USB, NFC, Bluetooth, and hybrid security keys that combine multiple connection types (e.g., USB + NFC + Bluetooth). These versatile keys enhance mobility and security by allowing users to authenticate across different platforms seamlessly.
- FIDO2 Passkeys on Unifyia ID Wallet
A standout feature of the Unifyia platform is its ability to issue identity credentials and passkeys through the Unifyia ID Wallet app, available on Android and iOS. This secure digital wallet provides an intuitive solution for managing digitally signed credentials on mobile devices issued directly via the Unifyia platform. It offers passwordless, phishing-resistant mobile authentication, integrating seamlessly with existing frameworks for multifactor authentication and identity verification. Through the Unifyia ID Wallet, organizations can issue visual PIV, PIV-I, and CIV identities, as well as OTPs, PKI, Consent, and FIDO2 credentials - all within one app.
FIDO2 Passkeys - Key Highlights
- Aligned with NIST SP 800-63-4 and FIPS 201 standards, promoting strong multifactor authentication with cryptographic protection for data integrity and security.
- Passkeys support federal zero-trust architecture by eliminating the need for traditional passwords.
- They offer robust authentication without the complexity of managing a full PKI infrastructure, simplifying deployment while maintaining high security standards.
- Passkeys provide phishing-resistant, passwordless authentication, ensuring seamless access to applications and services.
- They enhance interoperability between agencies by following federated identity management protocols, allowing a single passkey to be used securely across multiple government services. This reduces the need for MFA or two-step verification, as passkeys provide top-tier security independently.
- The solution is scalable, enabling federal agencies to extend strong authentication to new technologies and services, ensuring future readiness.
How do FIDO2 Passkeys Work?
- Public-private key cryptography When a user registers for a service using passkeys, the device generates a key pair - a private key that remains securely on the user’s device and a public key shared with the service. The private key is never exposed or transmitted, significantly enhancing security.
- Authentication To log in, the user verifies their identity using biometrics, a PIN, a pattern, or a hardware token like a security key. The private key then signs an authentication challenge from the service, proving the user’s identity without sharing sensitive information. The service verifies the signed challenge using the stored public key, confirming the user’s identity.
Best Practices for Implementing Passkeys
Unifyia recommends the following best practices for implementing passkeys within government and federal agencies to create a secure, phishing-resistant, and user-friendly passwordless authentication environment:
- Use passkeys as part of a multi-factor authentication strategy Incorporating passkeys alongside other authentication factors strengthens security.
- Support multiple authenticator types Ensure compatibility with platform authenticators (passkeys stored on user devices), cross-platform authenticators (passkeys on external security keys or smart cards), and digital wallets. This provides flexibility across devices and services, allowing users to authenticate securely from various platforms.
- Comply with FIDO2/WebAuthn and FIPS standards Ensure external security keys and smart cards comply with FIDO2/WebAuthn and FIPS 140-2 or FIPS 140-3 validated cryptographic standards for secure passkey storage.
- Implement essential security checks Ensure the legitimacy of authentication requests is verified using user presence verification, user authentication (e.g., biometrics), and the cryptographic challenge-response model.
- Configure risk-based authentication For high-risk scenarios such as logging in from a new device, location, or network, enforce additional verification measures without compromising user convenience.
- Promote usability and user education Focus on ease of use and educate users on the benefits and security of passkeys (FIDO2). Provide clear guidance on how to use and recover passkeys.
- Provide backup and recovery options Offer mechanisms for users to recover access if they lose their passkeys (FIDO2), such as using backup devices or reissuing new passkeys.
- Maintain a strong auditing system Implement continuous monitoring to detect suspicious activities or policy violations, ensuring swift detection and response to potential threats.
Passkeys Implementation Using the Unifyia Platform
Implementing the passkeys within federal agencies involves technical and policy aspects while ensuring alignment with federal standards. The issuance of the passkeys can be operator-based or self-issued by a user based on the organization's policies. The passkeys implementation for government and federal agencies using the Unifyia platform focuses on issuing passkeys on external security keys/smart cards and the Unifyia ID Wallet app. The following are the considerations for implementing the strategy:
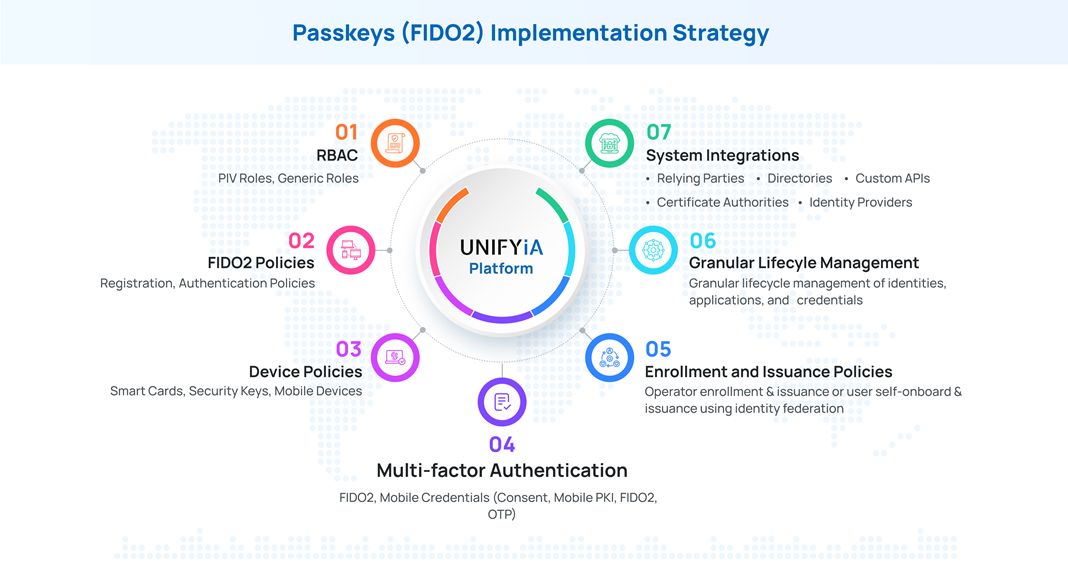
- Role-based access control Define granular user controls by allowing role-based access privileges. The Unifyia platform supports PIV and generic operator and administrator roles. It allows you to assign privileges as required to a specific role.
- Configure FIDO2 policies and workflows Define the policy considerations for the implementation and configure the FIDO2 policies and workflows required for the defined implementation.
- Device profiles Configure the device profiles for hardware tokens such as YubiKeys, smart cards such as ZTPass smart cards, and the Unifyia ID Wallet app that can be issued for issuance. This enables flexibility for remote and mobile workforce requirements.
- System integration Agencies must configure identity management systems and relying parties, including integration with federated identity providers to support FIDO2 workflows.
- MFA Define the authentication policies for the platform and integrated relying parties. You can configure a default authentication method and set a preferred order of multi-factor authentication options.
- User enrollment Define a user enrollment strategy. The Unifyia platform allows multiple options to onboard users, simplifying the enrollment process for users:
- Operators can sponsor and enroll new users.
- Users can leverage existing federal identity credentials such as PIV to onboard and enroll.
- Users can leverage the existing credentials of the integrated identity providers to enroll using OpenID Connect or Security Assertion Markup Language protocols. The platform currently supports Entra ID and Okta.
- User provisioning using the System for Cross-domain Identity Management (SCIM) protocol.
- Provisioning on behalf of relying parties such as Entra ID and Okta.
- Enterprise connections using custom APIs.
- Integrate external credential management systems using REST APIs to enable enrollment and issuance.
- Issuance policies Define the type of authenticators that can be issued – cross-platform authenticators (external security keys/smart cards) and/or mobile FIDO2 credentials. Define policies for the issuance and management of derived credentials such as DFC. The platform supports the following identity devices for the issuance of the FIDO2 credentials:
- IDEMIA- ID-One PIV 2.4 + FIDO2.1 on Cosmo V8.2
- ZTPass - ZTPass PIV 2.0 + FIDO2.1 on NXP P71D600
- Yubico - YubiKey 5 Series
- Digital Wallets (Unifyia ID Wallet app) on Android and iOS mobile devices
- Granular lifecycle management Define and implement granular lifecycle management of the identities, applications, and issued credentials.
System Configurations
The system configurations outlined below must be managed by the administrator to support the operator and user workflows detailed in the following sections. For ease of explanation, this guide considers two roles to explain the implementation of the passkeys – operator (for onboarding, enrollment, issuance, and lifecycle) and user (for self-onboarding, issuance, and lifecycle). Agencies can configure roles and permissions to enforce access restrictions.
- Configure a passkey registration and authentication policy for your organization and relying parties. Ensure that the authenticator attachment option is cross-platform. This will restrict the issuance of passkeys on external security keys and smart cards.
- Integrate directories for user federation.
- Integrate external identity providers for identity and user federation as required based on your implementation strategy and passkey provisioning.
- Configure the device profiles for the allowed authenticators.
- Configure user provisioning policies.
- Configure workflows for issuing passkeys for security keys, smart cards, and/or the Unifyia ID Wallet app.
- Configure roles and privileges.
- Configure MFA policies.
- Access to the Operator or User client based on the role and operating system.
User Self-Issuance of Passkeys
A user can log in to the Unifyia platform and self-issue passkey credentials or Derived FIDO2 Credentials. There are multiple ways for the user to log in to self-onboard and issue credentials based on the defined organization policies.
- Users can log in with the existing trusted credentials, such as a username and password issued by the identity providers such as Entra ID or Okta to issue passkeys. Users can use certificate-based Authentication to log in, verify their PIV credentials, and issue Derived passkeys.
- If FIDO2 provisioning is configured, then the user can log in with the existing trusted credentials of the IDPs such as Entra ID or Okta, and log in to the relying parties using the issued passkeys.
- Users can log into the platform and issue mobile digital credentials on the Unifyia ID Wallet app. For the FIDO2 credential, the users can use an NFC-enabled device.
This document focuses exclusively on the issuance of FIDO2 credentials for cross-platform authenticators.
Log In Using IDP Credentials to Issue Passkeys
Supported Authenticators
- IDEMIA - ID-One PIV 2.4 + FIDO2.1 on Cosmo V8.2
- ZTPass - ZTPass PIV 2.0 + FIDO2.1 on NXP P71D600
- Yubico - YubiKey 5 Series
Prerequisites
- IDPs such as Entra ID and Okta are configured on the Unifyia platform.
- You have Entra ID or Okta account credentials.
- You have a FIDO2-supported smart card such as a ZTPass smart card or a security key such as a YubiKey.
- You have a smart card reader to read smart cards if you are issuing smart cards.
- You have installed the Unifyia User Client on your system to access the connected devices. Select the Client based on your operating system – Windows or macOS.
Steps
The following are the steps to issue a FIDO2 Passkey
- Launch the Unifyia platform.
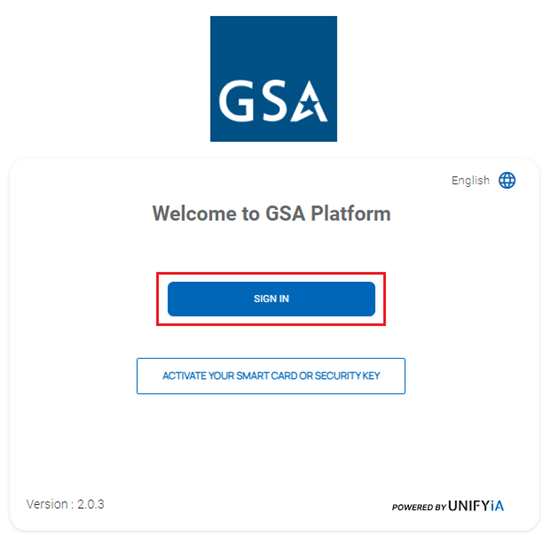
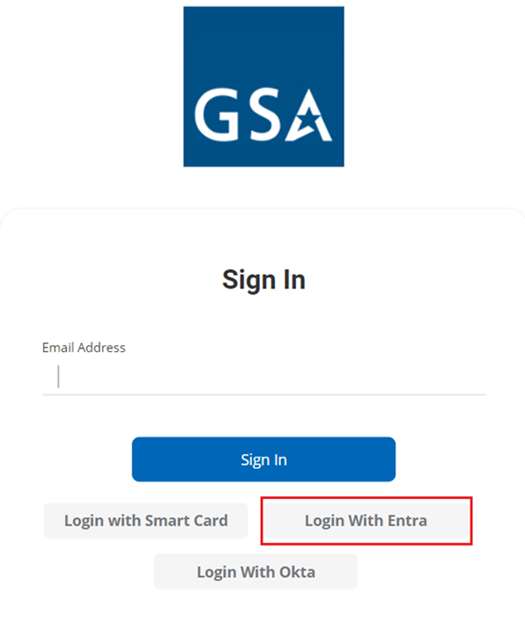
- Select Sign In on the home page.
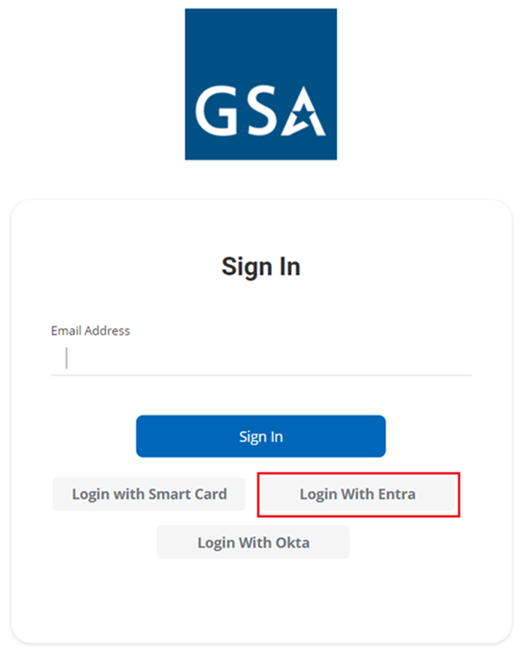
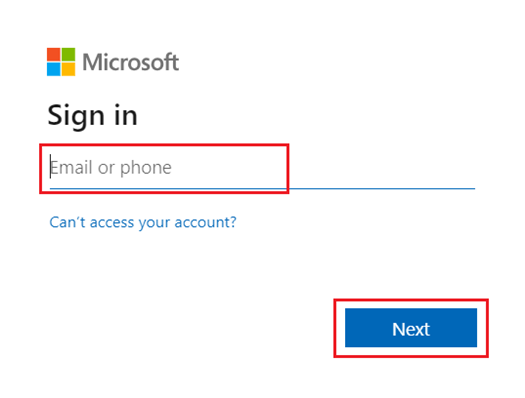
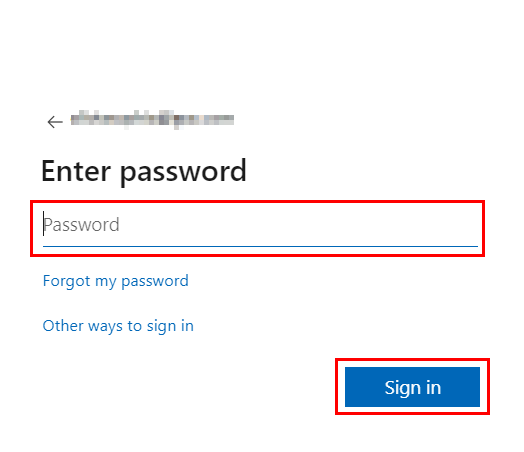
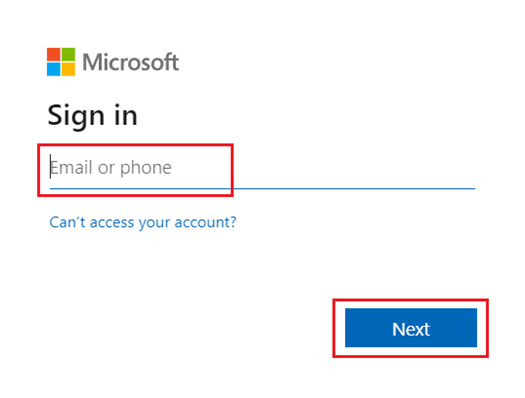
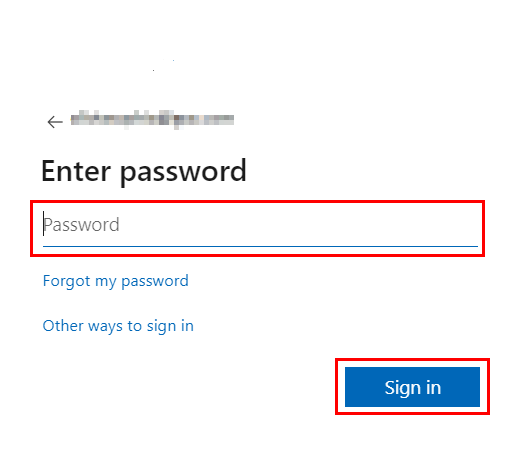
- For IDP-based login, select the button corresponding to the integrated IDP (Entra ID/Okta) on the Sign In page and enter your IDP credentials. Upon successful authentication, you will be logged into the platform.
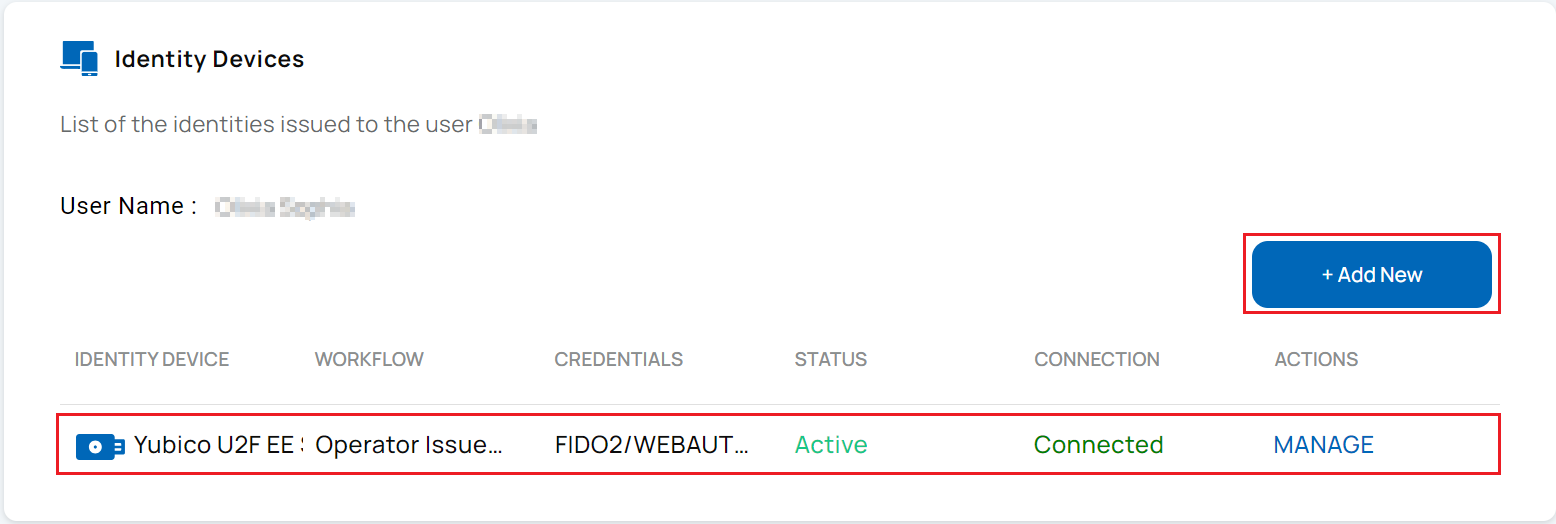
- Select Identities on the left side menu and select + Add New.

- If more than one identity is approved for you, you are prompted to select for which workflow you wish to issue an identity to continue. Select a workflow to proceed.
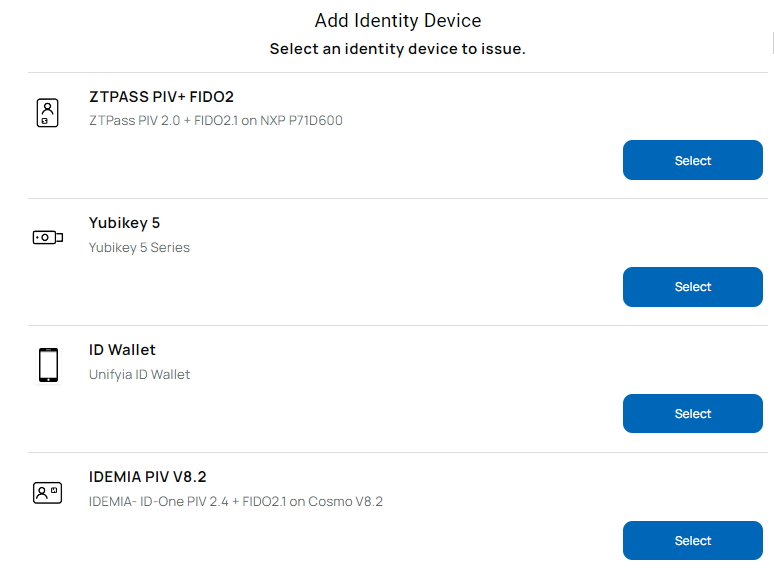
- From the listed identity device options, select the identity device (supported authenticators such as IDEMIA smart card, ZTPass smart card, or YubiKey) on which you wish to issue the FIDO2 credentials.
- Connect the identity device on which the FIDO2 credentials need to be issued.
- If you are using a FIDO2-supported smart card, insert it into the card reader connected to your computer.
- If you are using a FIDO2-supported security key, insert it into the USB port. It will prompt you to touch your security key. Touch the key.
- If you are using an NFC passkey, connect an external NFC reader to your computer. When prompted, tap the NFC passkey on the reader to continue.
- The connected reader and authenticator (identity device) details are displayed on the Issue Identity screen.
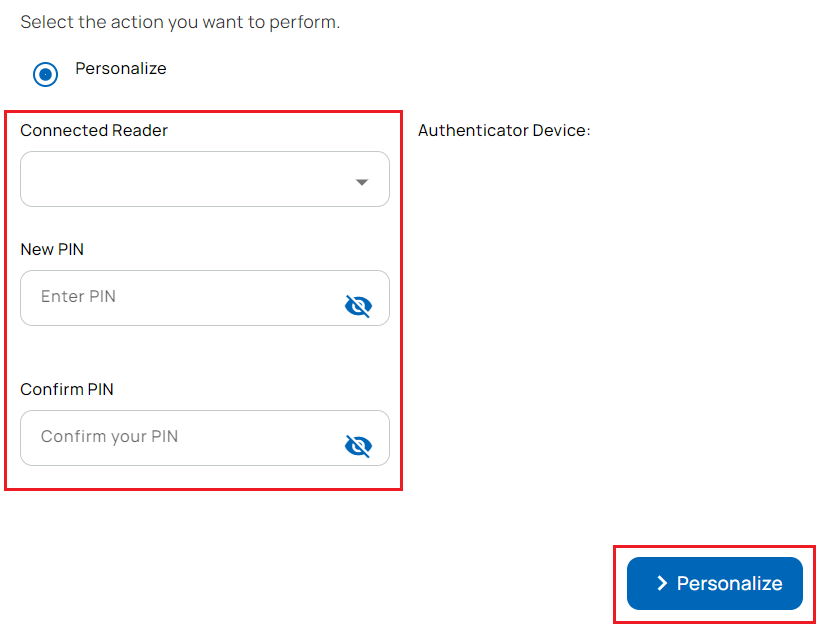
- Enter the PIN and confirm the PIN.
- Select Personalize.
- Issuance of the FIDO2 passkey on an identity device is completed.
Log In Using PIV ID to Issue Derived Passkeys
Supported Authenticators
- IDEMIA- ID-One PIV 2.4 + FIDO2.1 on Cosmo V8.2
- ZTPass - ZTPass PIV 2.0 + FIDO2.1 on NXP P71D600
- Yubico - YubiKey 5 Series
Prerequisites
- You have a PIV ID trusted by the Unifyia platform.
- You have a FIDO2-supported smart card ZTPass smart card or security key such as a YubiKey.
- You have a smart card reader to read smart cards if you are issuing smart cards.
- You have installed the Unifyia User Client on your system to access the connected devices. Select the Client based on your operating system – Windows or macOS.
Overview
A derived FIDO2 credential refers to a cryptographic credential that is generated or derived from a PIV ID card to support passwordless authentication. The issuance of the identity is allowed only when there is an existing, active ID. This derived FIDO2 credential allows you to authenticate and access secure systems or services without requiring the PIV ID card.
Steps
The following are the steps to issue a Derived FIDO2 Passkey
- Launch the Unifyia platform.
- Insert your PIV ID into the card reader attached to your computer.
- Select Sign In on the home page.
- On the Sign-In page, select the option Login with Smart Card.
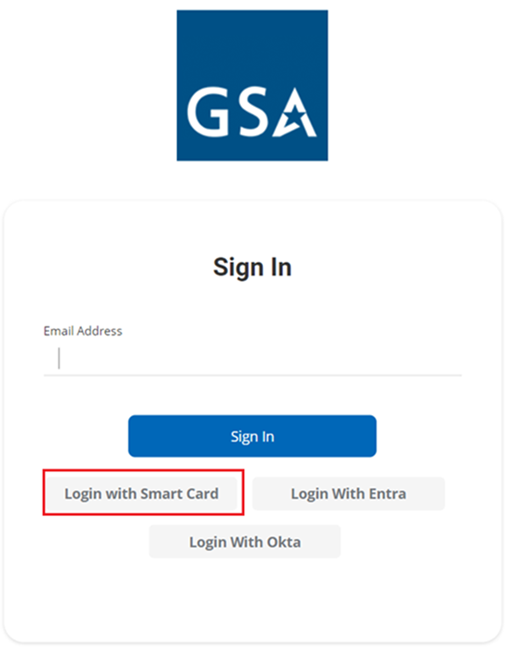
- The system will detect your identity automatically and prompt you to select the certificate. Select the certificate and enter the device PIN.
- On successful verification of the PIN, you are logged in to the platform.
- Select Identities on the left side menu.
- Select + Add New.

- If more than one identity is approved for you, you are prompted to select for which workflow you wish to issue an identity to continue. Select a workflow to proceed.
- From the listed identity device options, select the identity device (supported authenticators such as IDEMIA smart card, ZTPass smart card, or YubiKey) on which you wish to issue the FIDO2 credentials.
- The primary credential (PIV ID) verification page appears.
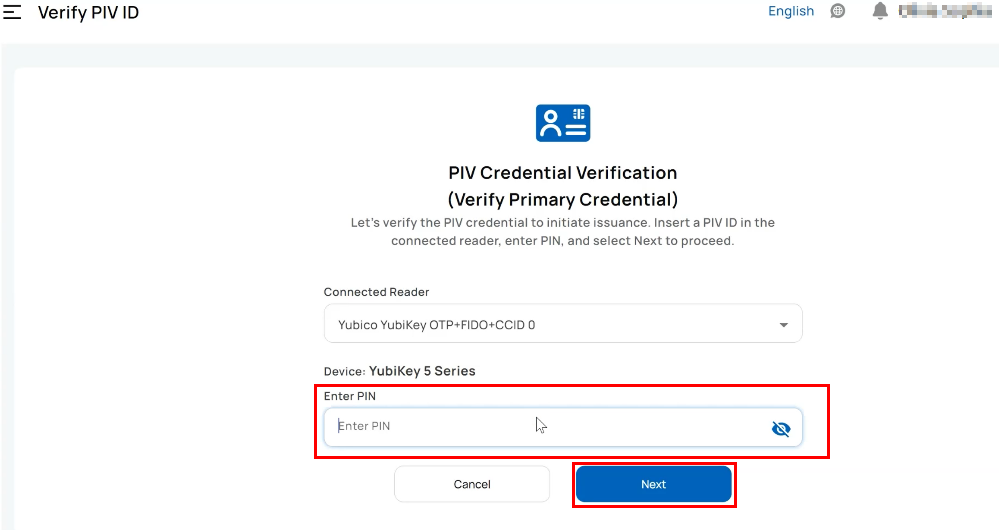
- Insert your PIV ID into the card reader attached to your computer. The reader and device type are auto-displayed. Enter the PIN.
- On successful verification of the primary credential, the system prompts you to proceed with the issuance of the derived credentials. Select Next.
- Connect the identity device on which the FIDO2 credentials need to be issued.
- If you are using a FIDO2-supported smart card, insert it into the card reader connected to your computer.
- If you are using a FIDO2-supported security key, insert it into the USB port. It will prompt you to touch your security key. Touch the key.
- If you are using an NFC passkey, connect an external NFC reader to your computer. When prompted, tap the NFC passkey on the reader to continue.
- The connected reader and authenticator (identity device) details are displayed on the Issue Identity Screen.
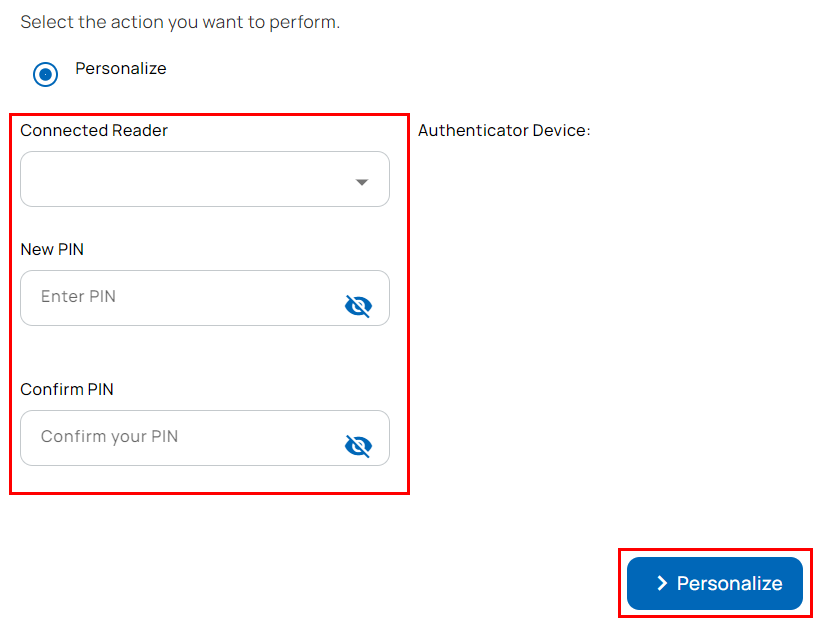
- Enter PIN and confirm PIN.
- Select Personalize.
- Issuance of the FIDO2 passkey on an identity device is completed.
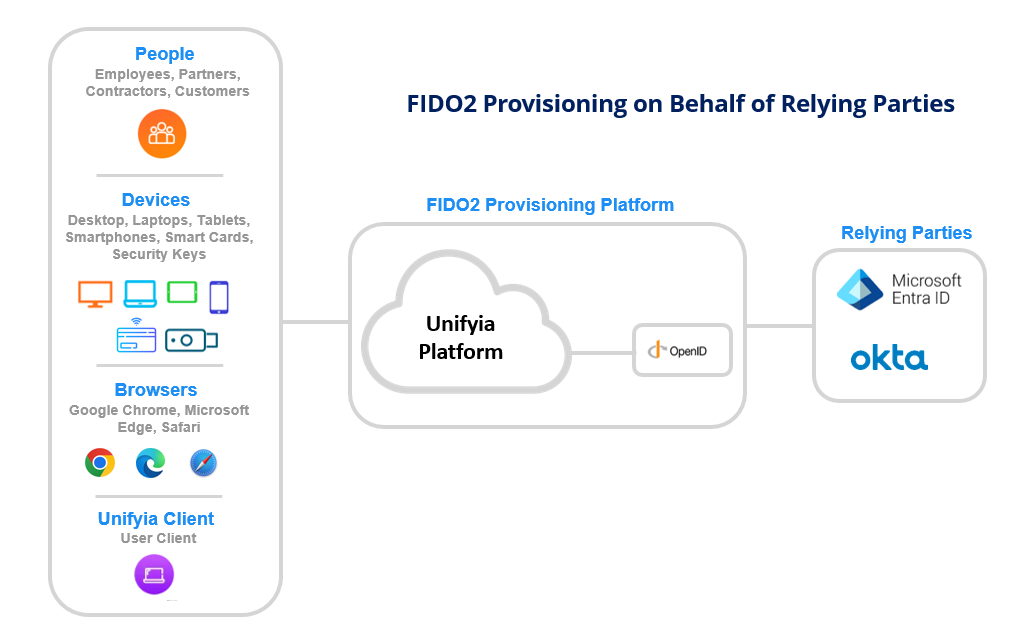
FIDO2 Provisioning on Behalf of Relying Parties
Supported Authenticators
- IDEMIA- ID-One PIV 2.4 + FIDO2.1 on Cosmo V8.2
- ZTPass - ZTPass PIV 2.0 + FIDO2.1 on NXP P71D600
- Yubico - YubiKey 5 Series
Prerequisites
- Relying parties such as Entra ID or Okta are configured for FIDO2 provisioning on the Unifyia platform.
- Relying parties such as Entra ID or Okta are configured as IDPs on the Unifyia platform.
- You have relying party credentials for authenticating to the platform.
- You have a FIDO2-supported smart card such as a ZTPass smart card or security key such as a YubiKey.
- You have a smart card reader to read smart cards if you are issuing smart cards.
- You have installed the Unifyia User Client on your system to access the connected devices. Select the Client based on your operating system – Windows or macOS.
Steps
The following are the steps to issue a FIDO2 passkey:
- Launch the Unifyia platform.
- Select Sign In on the home page.
- For IDP-based login, select the button corresponding to the integrated IDP (Entra ID/Okta) on the Sign In page and enter your IDP credentials. Upon successful authentication, you will be logged into the platform.
- Select Identities on the left side menu.
- Select + Add New.

- If more than one identity is approved for you, you are prompted to select for which workflow you wish to issue an identity to continue. Select a workflow to proceed.
- From the listed identity device options, select the identity device (supported authenticators such as IDEMIA smart card, ZTPass smart card, or YubiKey) on which you wish to issue the FIDO2 credentials.
- Connect the identity device on which the FIDO2 credentials need to be issued.
- If you are using a FIDO2-supported smart card, insert it into the card reader connected to your computer.
- If you are using a FIDO2-supported security key, insert it into the USB port. It will prompt you to touch your security key. Touch the key.
- If you are using an NFC passkey, connect an external NFC reader to your computer. When prompted, tap the NFC passkey on the reader to continue.
- The connected reader and authenticator (identity device) details are displayed on the Issue Identity Screen.
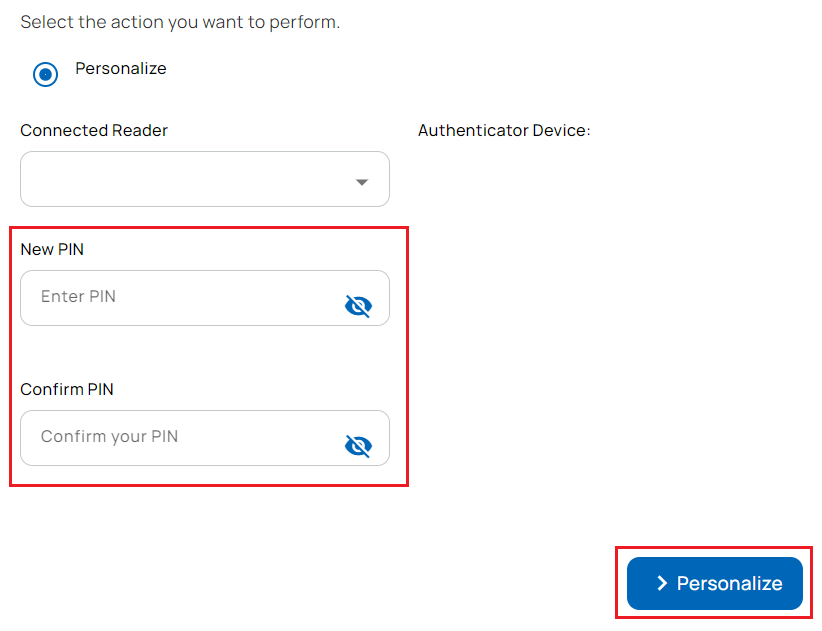
- Enter PIN and confirm PIN.
- Select Personalize.
- Issuance of the FIDO2 passkey on an identity device is completed.
User Issuing Mobile Credentials on the Unifyia ID Wallet App
Overview
Digital wallet credentials on mobile apps help you to authenticate (confirm identity) in situations such as accessing secure facilities/systems, registering for services, or completing transactions online without the need for any physical device. These credentials leverage secure technologies such as encryption and biometrics to ensure authentication and security.
Prerequisites
- Ensure that you are registered as a user with the necessary privileges to access the Unifyia platform user portal by an authorized operator within the organization.
- The users from the integrated relying parties can use their existing credentials to log in to the platform.
- You have an iOS or Android mobile device.
- Security key that can be connected over NFC for FIDO2 registration.
- Download and install the Unifyia ID Wallet app on an iOS mobile device from the app store or the Play Store for an Android device.
Supported Mobile Phones
- iOS 13+
- Android 13+
Steps
The following are the steps for issuing the mobile credentials on the Unifyia ID Wallet app
- Log into the Unifyia platform as a platform user or federated user.
- Navigate to Identities.
- Select + Add New.
- If more than one identity is approved for you, you are prompted to select for which workflow you wish to issue an identity to continue. Select a workflow to proceed.
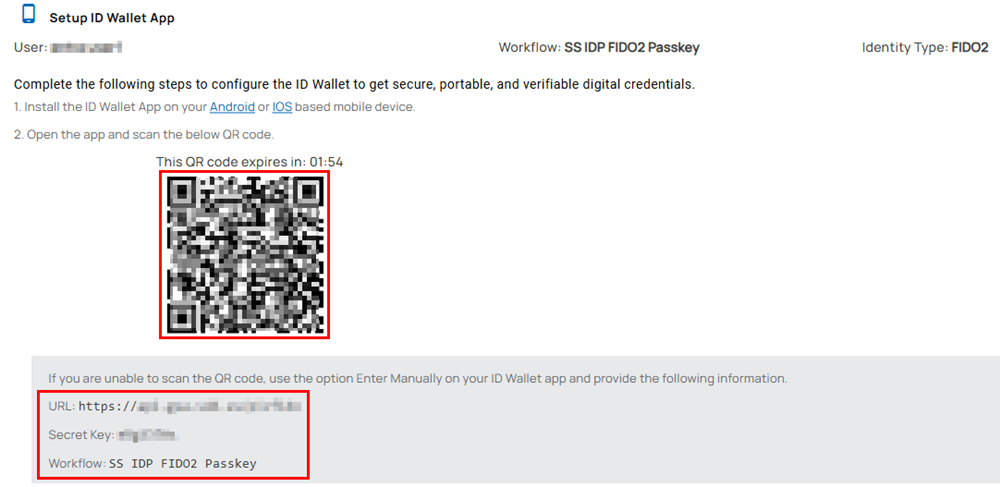
- Select the option ID Wallet from the listed identity device options. The page to set up the ID Wallet app appears.
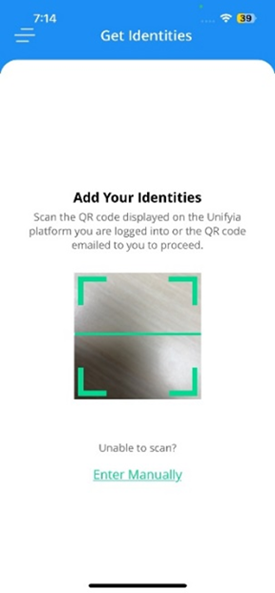
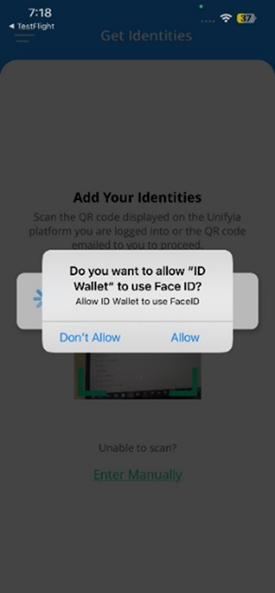
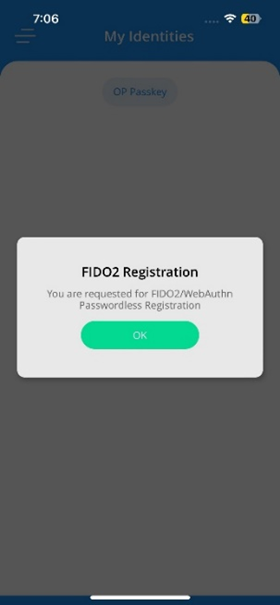
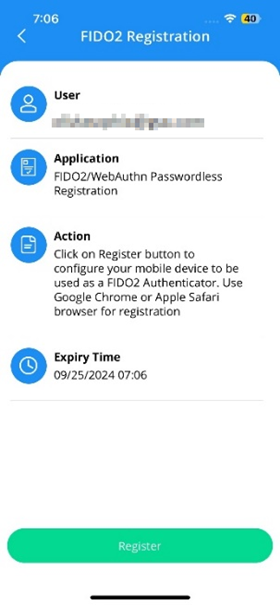
- Open the Unifyia ID Wallet app on your mobile. Follow the screens below and the steps to issue mobile credentials.
- Scan the QR code displayed on the page using the wallet app.
- Tap Allow to allow the ID Wallet app to use the set built-in security feature of the mobile device (device-native authentication such as a passcode, pattern, face, or fingerprint) for verification.
- On successful verification, the app fetches your identities. Tap OK.
- If your organization has approved FIDO2 credential issuance for your group, the app prompts you to continue the FIDO2 registration process. Tap OK to continue.
- You can delay the FIDO2 registration until later. To proceed with the registration at a convenient time, access the notification to register in the app's Notification menu. Note that this link will only be active for 12 hours.
- On the FIDO2 registration screen, tap Register.
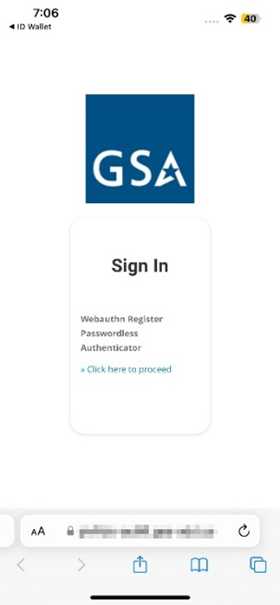
- You are redirected to the Unifyia platform on your phone browser.
- Select the link Click here to proceed.
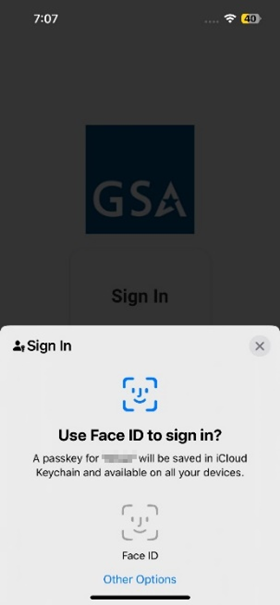
- You will be prompted to set up a security key. If you see a screen prompting for Face ID to sign in, select Other Options > Security Key to continue with security key registration. Tap the NFC-enabled security key near the NFC antenna of the mobile device. The NFC antenna is usually located on the top of the phone for iOS devices and on the back of the phone for Android devices.
- When prompted, set up a PIN to continue.
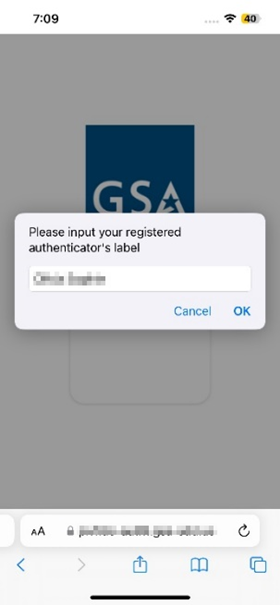
- On the next screen, a label for the registered passkey is displayed. If required, rename it and select OK. You have completed the registration process.
- Tap Back to Application. Select to open in the ID Wallet app, when prompted.
- Your mobile credentials are successfully updated with the FIDO2 Passkey credential. Select OK.
- You have all the mobile credentials issued: Visual ID, FIDO2, Consent, PKI, and OTP.
- You are now all set to use your mobile credentials to initiate multi-factor/passwordless authentication.
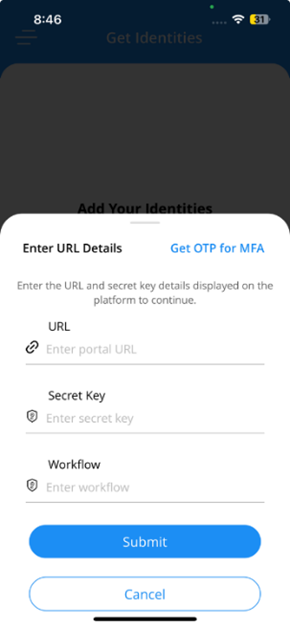
- If QR code scanning fails in the Unifyia ID Wallet app, select Enter Manually on the Get Identities screen.
- On the Unifyia platform, navigate to the ID Wallet setup page. Locate the section displaying the URL, secret key, and workflow.
- Input the platform URL, e.g.,
https://example.utopia.net, the Secret Key, and the name of the workflow shown on the platform page. - Tap Submit and complete the issuance process as described above to issue the mobile credentials on the ID Wallet app.
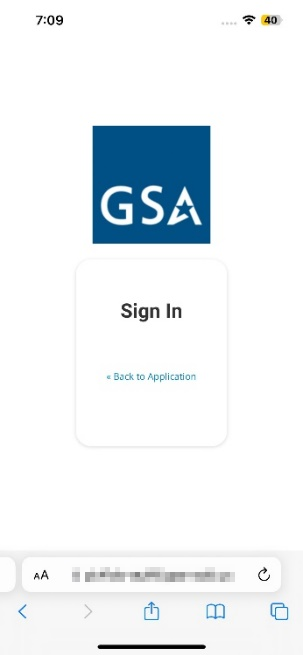
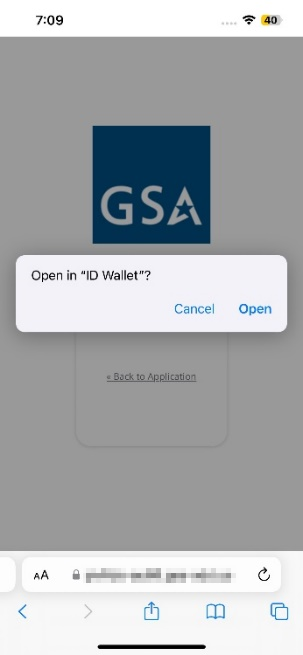
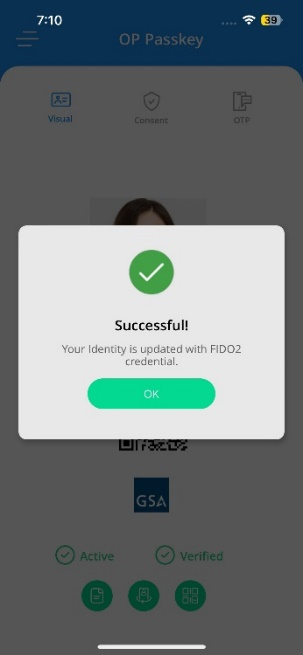
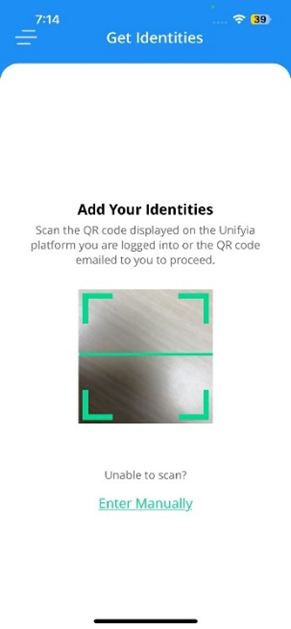
Unifyia ID Wallet Credentials
You can view the following credentials on the Unifyia ID Wallet.
Visual The visual credential shows your picture and name if you have used a PIV ID credential for verification or you have completed enrollment with face. In all other cases, you can only view the name.
FIDO2 The FIDO2 credential allows users to log in to the platform using security keys connected over NFC.
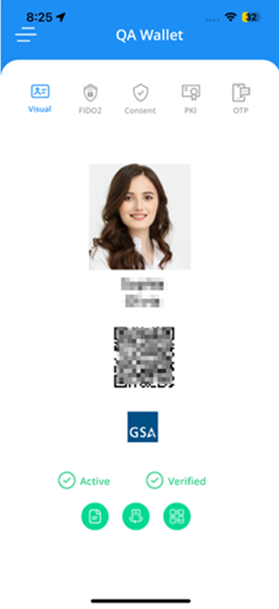

Consent The consent keys are used for approving an authentication request sent to the ID Wallet from the platform or integrated applications.
PKI If you have used a PIV ID card for primary card verification, derived PIV certificates (authentication, digital signature, and encryption) are issued. In all other cases, PIV certificates (authentication, digital signature, and encryption) are issued.
- Card Authentication This certificate allows for the card’s verification in scenarios where direct PIN entry or biometric access might not be available. It provides access to systems or facilities that may not be able to read the PIV Authentication Certificate but still need to validate the card.
- Authentication This credential is used for the certificate-based login requests received as consent requests or push notifications from either the platform or third-party applications for passwordless authentication. It is one of the most secure credentials that can be leveraged for authentication.
- Digital Signature This credential is used to sign electronic documents or emails when sent from a mobile device.
- Encryption This credential enables users to encrypt sensitive data, such as emails or files, so that only authorized recipients can decrypt and read the information. This ensures confidentiality, especially in mobile environments where secure communication is critical.


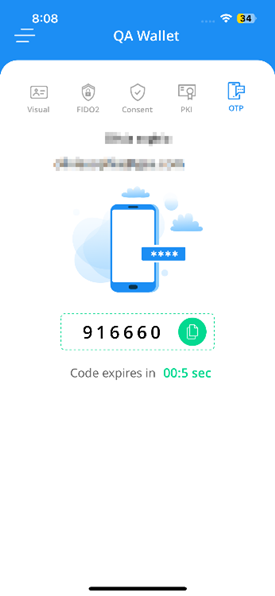
OTP The OTP credential allows a user to login to the platform in an offline mode. It displays the OTP that can be used to authenticate in an offline mode.
Operator Issuance of Passkeys
An operator can log into the Unifyia platform and issue FIDO2 passkey credentials or Derived FIDO2 Credentials on behalf of the customer based on the defined organization policies. For the issuance of the DFCs, users must be present on-site to verify their PIV credentials before the issuance. The operator can:
- Sponsor, enroll the user with data and face biometrics, and issue passkeys.
- Issue DFCs to a user after performing PIV credential verification.
- Issue mobile digital credentials in the Unifyia ID Wallet app installed on a user’s mobile device.
Before You Begin
- Ensure you’re registered with the necessary privileges as an authorized operator within your organization.
- You must have at least one active identity device to access the Unifyia platform.
- Relevant devices such as smart cards or security keys are available if you are issuing passkeys (FIDO2).
- You have installed the Unifyia Operator Client on your system to access the connected devices. Currently, the Operator Client is available only for Windows systems.
- Groups must be added.
- A workflow must be created to enable the issuance of the Passkeys.
Sponsor User
Log in to the Unifyia platform using the operator credentials. Navigate to Management > Users. On the displayed page, select + Onboard User. The Onboard User page appears.

Provide the following data and select Save to complete onboarding.
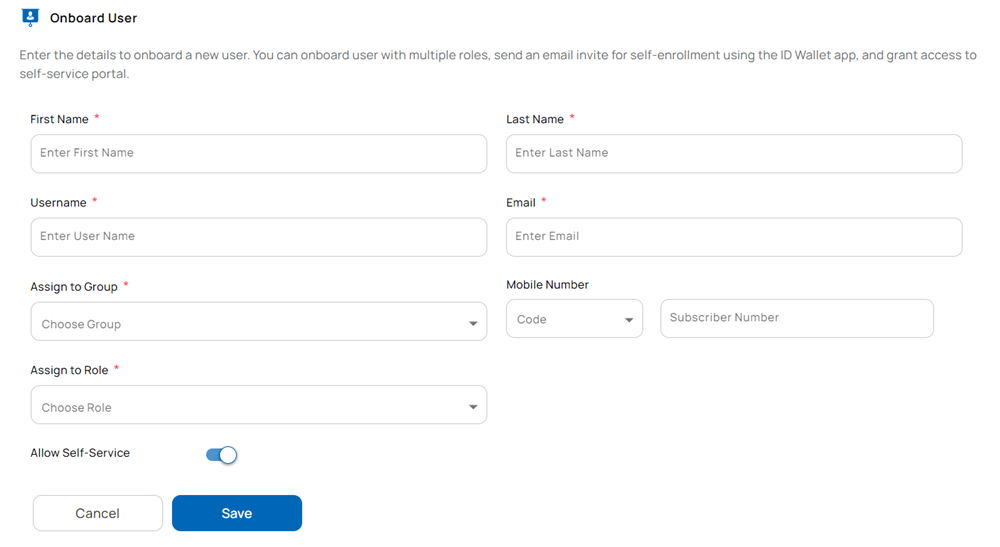
- First Name (e.g., Olivia)
- Last Name (e.g., Sophia)
- Username: Unique name to identify the user (e.g., oliviasophia)
- Email: Should be unique
- Assign to Group: Select the group(s) from the drop-down list to which the user needs to be assigned.
- Assign to Role: Select the role(s) to assign to the users. Depending on your organization’s policy, you can assign multiple roles to each user. The ability to assign multiple roles is determined by the privileges granted to the sponsoring operator. For example:
- If you want to onboard the user with the role of User, select only the User role.
- If you want to onboard a user with dual permissions of a sponsor and user, select both the roles - User and Sponsor.
- Mobile Number Select the Country code and enter the Subscriber Number.
- Slide the Allow Self-Service button to the right. Enabling this option grants the user access to the platform.
This completes the sponsoring of a user. You are directed to proceed with the enrollment of the user. Continue by selecting Yes.
Enroll User
The enrollment wizard is displayed. It presents a series of steps that must be completed to complete the data capture process based on the configured workflow. As you progress from one step to another, the information provided during each step is saved.
Information
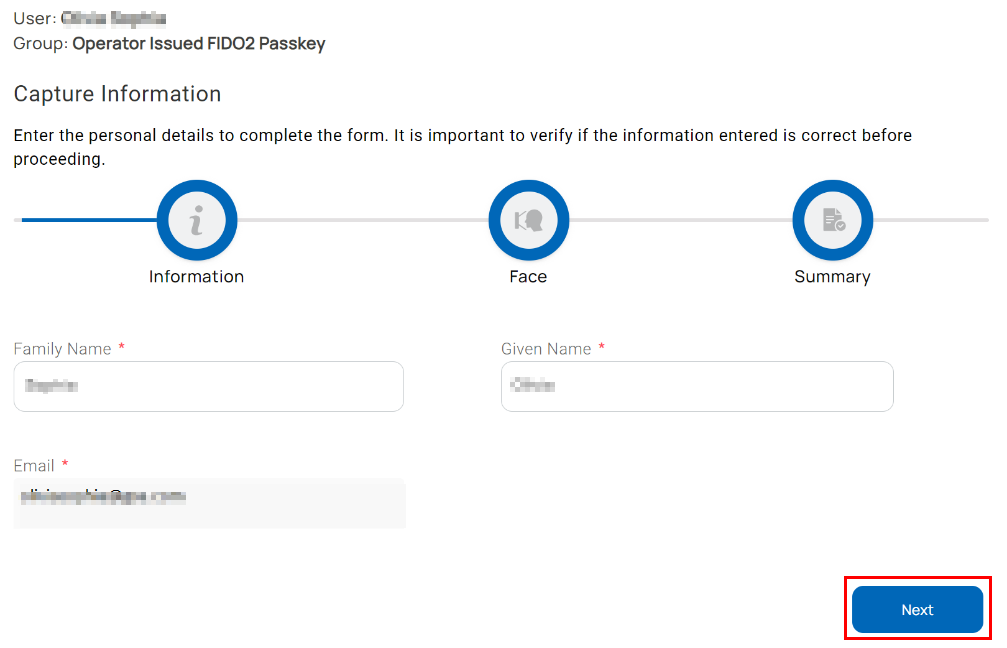
On the information capture wizard, select Next. The face capture wizard is displayed.
Face
On the face capture wizard, proceed to capture a face image by taking a photo using the device’s camera or a connected camera. Alternatively, you can upload a photo from local images. The supported formats are PNG, JPEG, and JPG.
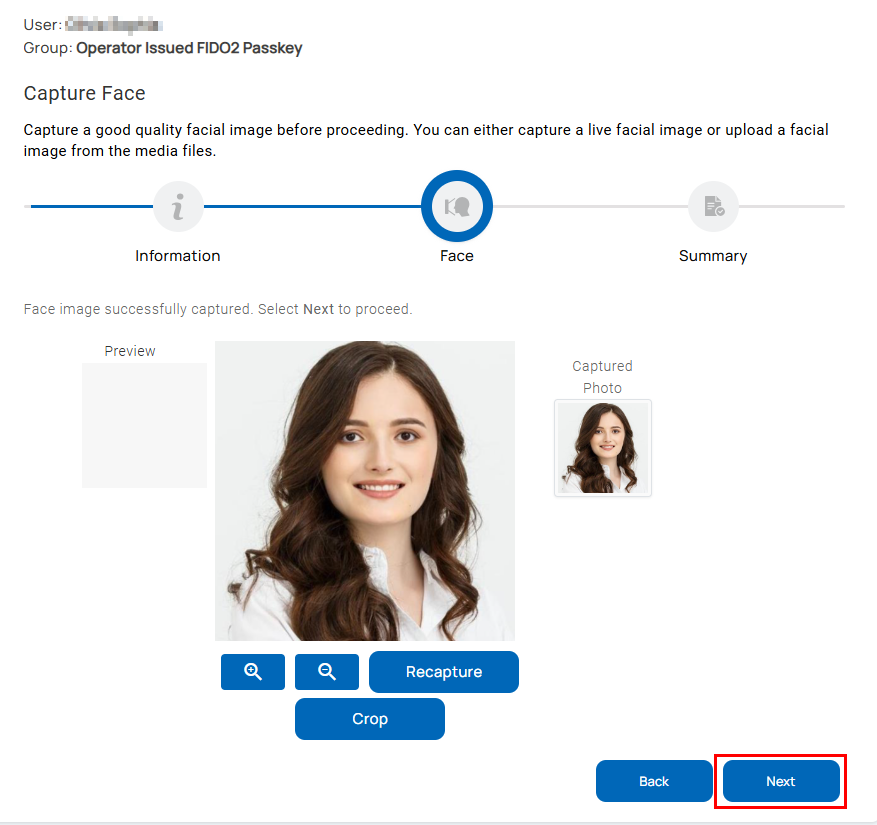
Capture Image
- Select Capture to display the face capture screen.
- If the plugged-in camera device is not selected, select a camera device listed in the drop-down. By default, the integrated camera of the laptop is selected.
- To capture a photo, adjust the position of the user’s face within the cropping rectangle by moving the cropper box accordingly.
- You can zoom in or out to get a clear picture by selecting the buttons with the Zoom In and Zoom Out icons.
- Select the Crop button to capture the photo.
- If the workflow is configured to allow the conversion of the captured photo to a transparent image, the captured photo is converted into a transparent photo and displayed on the screen. If you wish to use the transparent image on the visual ID, for the Use Transparent Photo option, select Yes.
- Check the preview of the captured photo.
- If it lacks clarity, select Delete.
- Select Recapture to restart the photo-capturing process.
Upload Photo
- Select the option Upload and select a photo stored locally on your device.
- You can zoom in or out to get a clear picture by selecting the buttons with the Zoom In and Zoom Out icons.
- Adjust the position of the user’s face within the cropping rectangle by moving the cropper box accordingly.
- Select Crop to capture the photo.
- If the workflow is configured to allow the conversion of the captured photo to a transparent image, the captured photo is converted into a transparent photo and displayed on the screen. If you wish to use the transparent image on the visual ID, for the Use Transparent Photo option, select Yes.
- Check the preview of the captured photo.
- If it lacks clarity, select Delete.
- Select Recapture to restart the photo-capturing process.
Once you have completed the face capture, select Next to view the summary page.
Summary
All the demographic and biometric details captured are displayed for a final review.
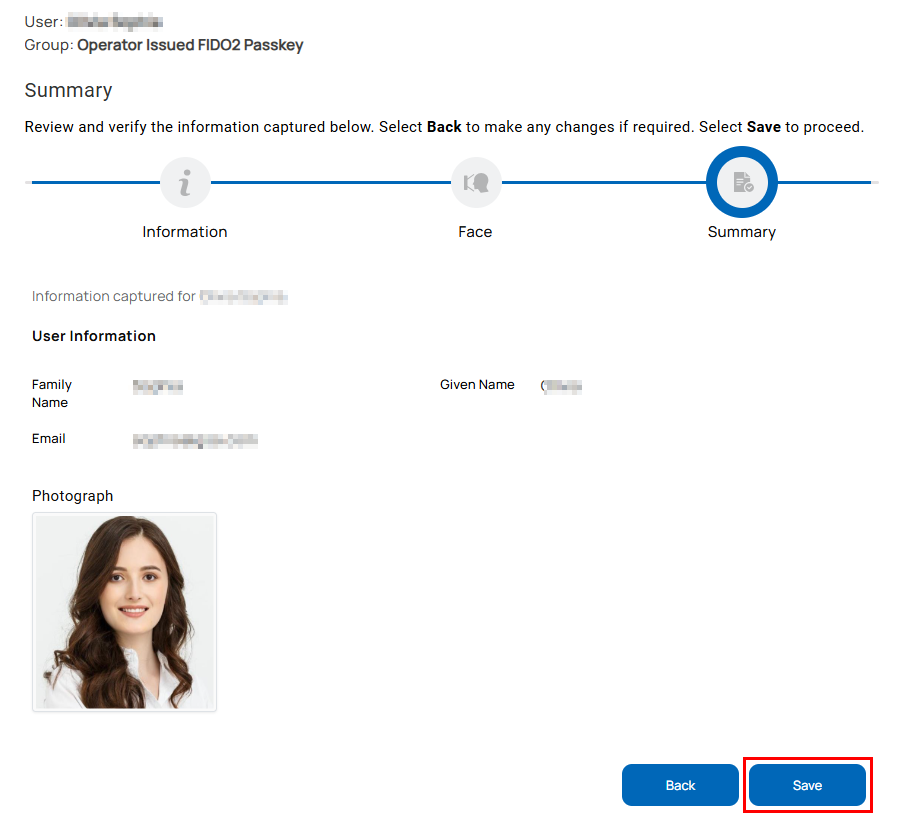
- To edit the details, Select the Back button or navigate to the respective enrollment step.
- If the data collected is as per the specifications, select Save to complete the enrollment. The enrollment process is complete for the user. An email informing that the enrollment application is submitted is sent to the user.
The next step is to issue identity devices. You are prompted to proceed with the issuance. Choose to continue by selecting Yes.
Issue FIDO2 Passkeys
- From the listed identity device options, select the identity device (supported authenticators such as IDEMIA smart card, ZTPass smart card, or YubiKey) on which you wish to issue the FIDO2 credentials.
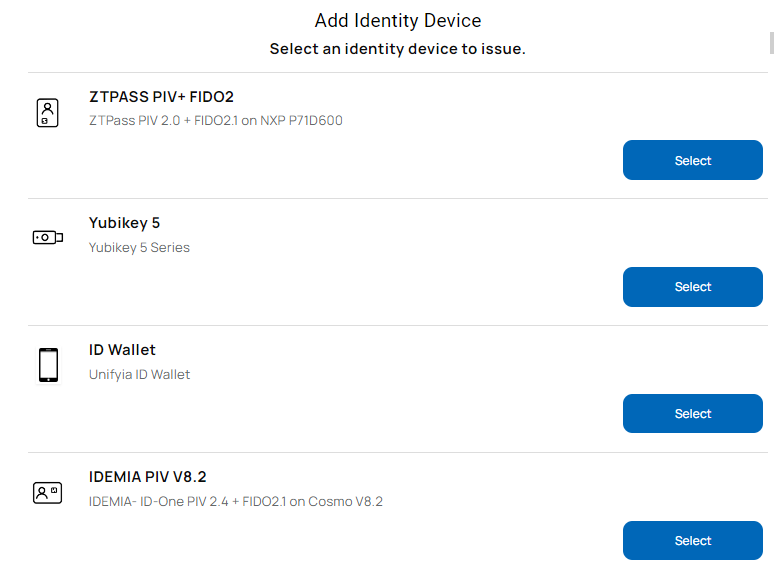
- Connect the identity device on which the FIDO2 credentials need to be issued.
- If you are using a FIDO2-supported smart card, insert it into the card reader connected to your computer.
- If you are using a FIDO2-supported security key, insert it into the USB port. It will prompt you to touch your security key. Touch the key.
- If you are using an NFC passkey, connect an external NFC reader to your computer. When prompted, tap the NFC passkey on the reader to continue.
- The connected reader and authenticator (identity device) details are displayed on the Issue Identity Screen.
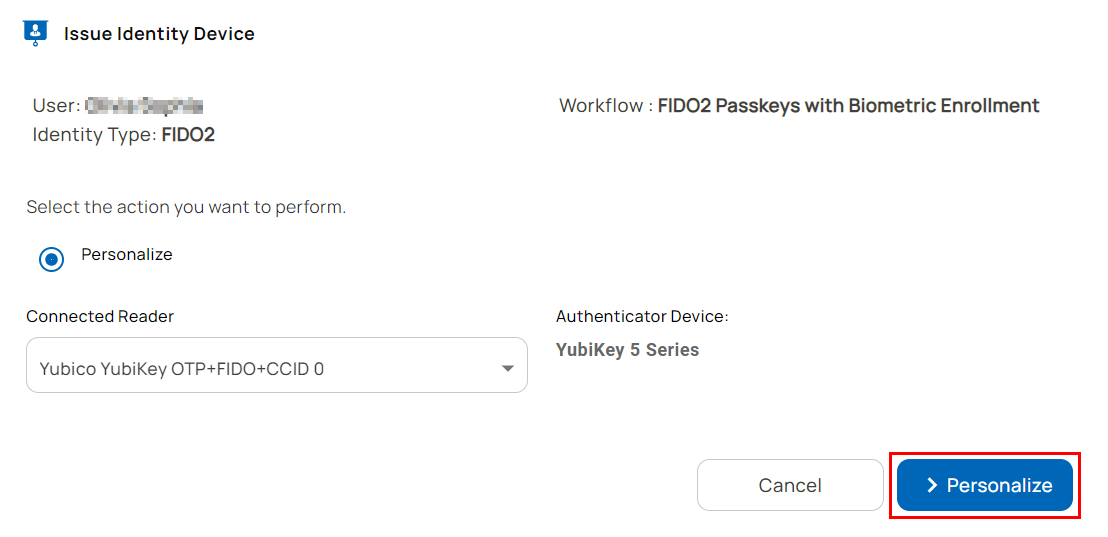
- Select Personalize.
- An email that contains the PIN is sent to the user.
- Issuance of the FIDO2 credential on an identity device is completed.
The next section explains how to issue a Derived FIDO2 Credential.
Issue Derived FIDO2 Credential
Supported Authenticators
- IDEMIA- ID-One PIV 2.4 + FIDO2.1 on Cosmo V8.2
- ZTPass - ZTPass PIV 2.0 + FIDO2.1 on NXP P71D600
- Yubico - YubiKey 5 Series
Prerequisites
- Ensure that users are registered with the necessary privileges within the organization.
- The user is present on site.
- Users must have at least one active PIV ID trusted by the Unifyia platform which will be used as a primary credential to validate the issuance status.
- You have a FIDO2-supported smart card such as a ZTPass smart card or a security key such as a YubiKey.
- You have a smart card reader to read smart cards if you are issuing smart cards.
- You have installed the Unifyia Operator Client on your system to access the connected devices. Currently, the Operator Client is available only for Windows systems.
Steps
The following are the steps to issue a Derived FIDO2 Passkey:
- Launch the Unifyia platform.
- Log in using your operator credentials.
- Navigate to Management > Users. Search the user either by name or email. Under the Actions column, select the Issue Identity icon to start the issuance process.

- If the user is approved for multiple identities, you will be prompted to select the workflow for which you wish to issue an identity.
- From the listed identity device options, select the identity device (supported authenticators such as IDEMIA smart card, ZTPass smart card, or YubiKey) on which you wish to issue the DFC passkeys.
- You need to first verify the issuance status of the user’s PIV ID.
- Insert the user’s PIV ID into the card reader attached to your computer.
- The primary card verification page appears.
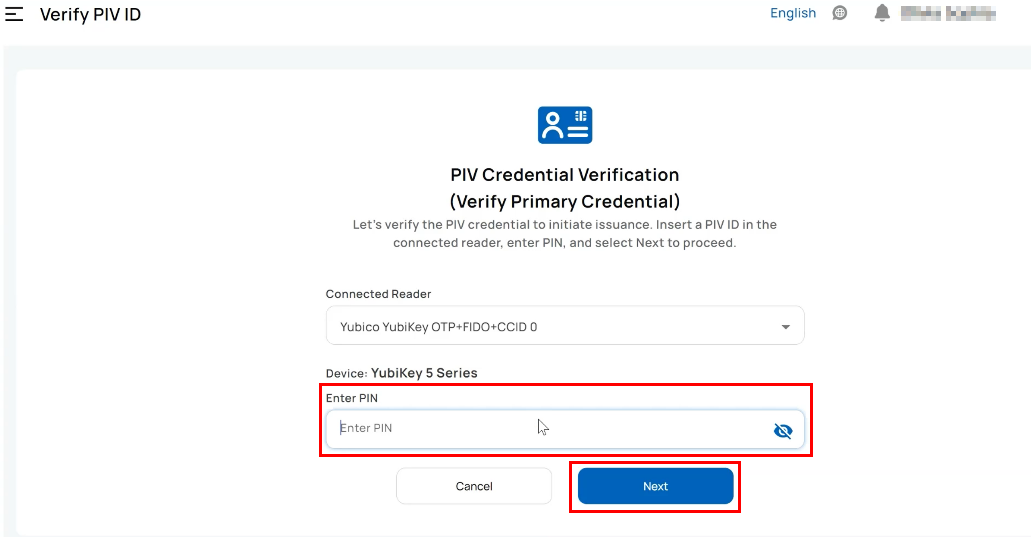
- Select the PIV ID type and ask the user to enter the PIN when prompted.
- On successful verification of the primary credential, the system prompts you to proceed with the issuance of the derived credentials. Select Next.
- Connect to the identity device on which the DFIDO credentials need to be issued.
- If you are using a FIDO2-supported smart card, insert it into the card reader connected to your computer.
- If you are using a FIDO2-supported security key, insert it into the USB port. It will prompt you to touch your security key. Touch the key.
- If you are using an NFC passkey, connect an external NFC reader to your computer. When prompted, tap the NFC passkey on the reader to continue.
- The connected reader and authenticator (identity device) details are displayed on the Issue Identity Screen. Select Personalize.
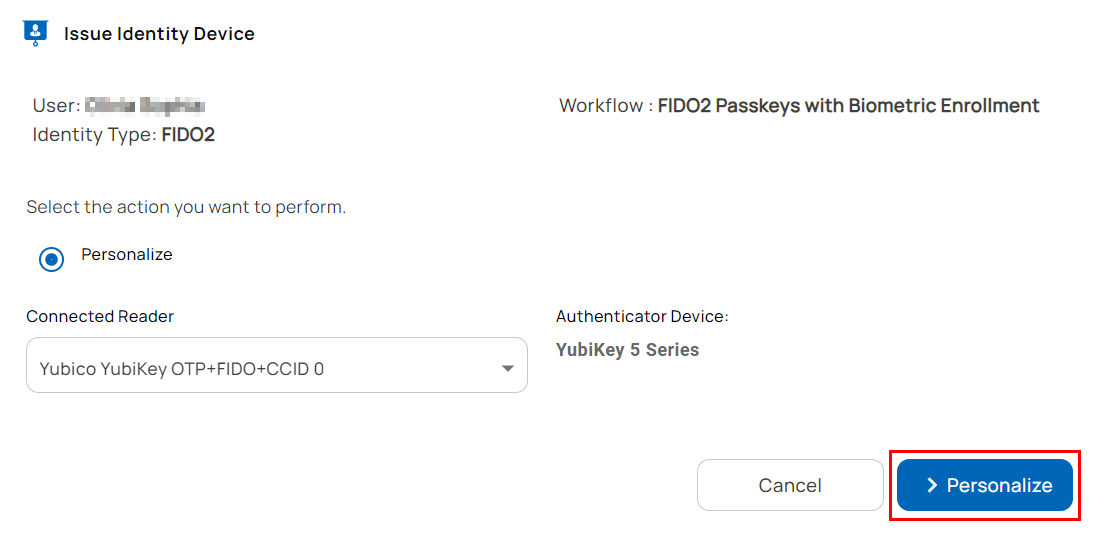
- An email that contains the PIN is sent to the user.
- Issuance of the derived FIDO credential on an identity device is completed.
The next section explains how to issue mobile credentials on the Unifyia ID Wallet app.
Operator Issuing Mobile Credentials on the Unifyia ID Wallet App
Prerequisites
- The user is present on the site.
- The user has an iOS or Android mobile device.
- Download and install the Unifyia ID Wallet app on an iOS mobile from the mobile device’s app store and for an Android device from the Play Store.
- Security key that can be connected over NFC for FIDO2 registration.
Supported Mobile Phones
- iOS 13+
- Android 13+
Steps
The following are the steps to issue the mobile credentials on the ID Wallet app
- Navigate to Management > Users. On the displayed List of Users page, search for the newly onboarded user. Under the Actions Column, select the Issue Identity icon.
- From the listed identity device options, select ID Wallet. The page to set up the ID Wallet app appears.
- Open the Unifyia ID Wallet app on the mobile device.
- Scan the QR code displayed on the page using the wallet app.
- Tap Allow to allow the ID Wallet app to use the set built-in security feature of the mobile device (device-native authentication such as a passcode, pattern, face, or fingerprint) for verification. The user must provide the required verification details.
- On successful verification, the app fetches the identities. Tap OK.
- If your organization has approved FIDO2 credential issuance for the user’s group, the app prompts you to continue the FIDO2 registration process. Tap OK to continue.
- You can delay the FIDO2 registration until later. To proceed with the registration at a convenient time, access the notification to register in the app's Notification menu. Note that this link will only be active for 12 hours.
- On the FIDO2 registration screen, tap Register.
- You are redirected to the Unifyia platform on the phone browser.
- Select the link Click here to proceed.
- You will be prompted to set up a security key. If you see a screen prompting for Face ID to sign in, select Other Options > Security Key to continue with security key registration. Tap the NFC-enabled security key near the NFC antenna of the mobile device. The NFC antenna is usually located on the top of the phone for iOS devices and on the back of the phone for Android devices.
- When prompted, ask the user to provide a PIN to continue.
- On the next screen, a label for the registered passkey is displayed. If required, rename it and select OK. You have completed the registration process.
- Tap Back to Application. When prompted, select to open in the ID Wallet app, .
- The mobile credentials are successfully updated with the FIDO2 Passkey credential. Select OK.
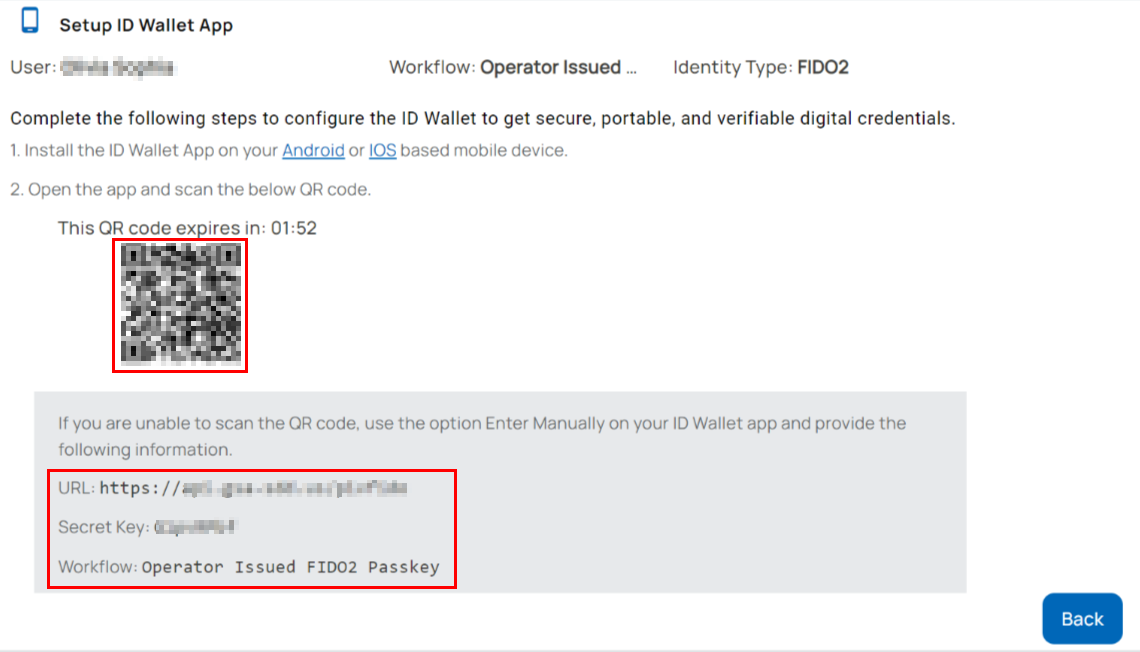
- If QR code scanning fails in the Unifyia ID Wallet app, select Enter Manually on the Get Identities screen.
- On the Unifyia platform, navigate to the ID Wallet setup page. Locate the section displaying the URL, secret key, and workflow.
- Input the platform URL, e.g.,
https://example.utopia.net, the Secret Key, and the name of the workflow shown on the platform page. - Tap Submit and complete the issuance process as described above to issue the mobile credentials on the ID Wallet app.
- The user’s mobile now has Visual, FIDO2, Consent, PKI, and OTP credentials.


User Authentication Using the Issued Credentials
The users now possess the issued passkeys (FIDO2) on external security keys/smart cards and also have credentials on the Unifyia ID Wallet app. They can now use these to authenticate to the Unifyia platform and the integrated relying parties. Currently, the platform supports authenticating to the relying parties such as Entra ID and Okta.
In the following sections, the different methods and modes of authenticating to the relying parties using the issued credentials are explained. Below is the list:
- Authenticate using the passkeys
- Scan a QR Code
- Use security keys such as NFC Card/Security Key/Smart Card
- Authenticate using the Unifyia ID Wallet Credentials
- FIDO2 Credential
- PKI Credential
- Consent Credential (Push Verify)
- OTP Credential
Authenticate Using the Passkeys
This section outlines the process for users to authenticate to the integrated relying party application using the issued passkeys.
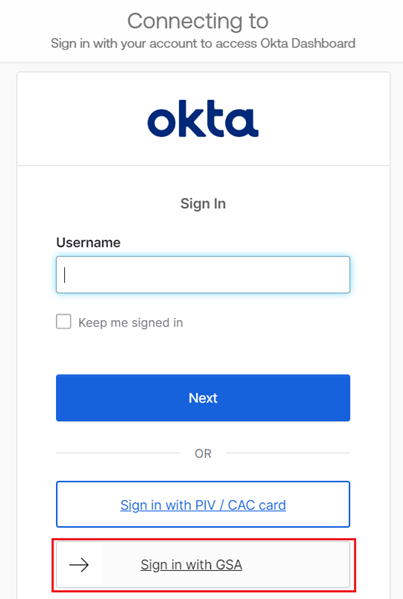
- Launch the relying party application on a PC.
- Select Sign In with GSA. You are directed to the Unifyia platform Sign In page.
- Enter your email address and select SIGN IN.
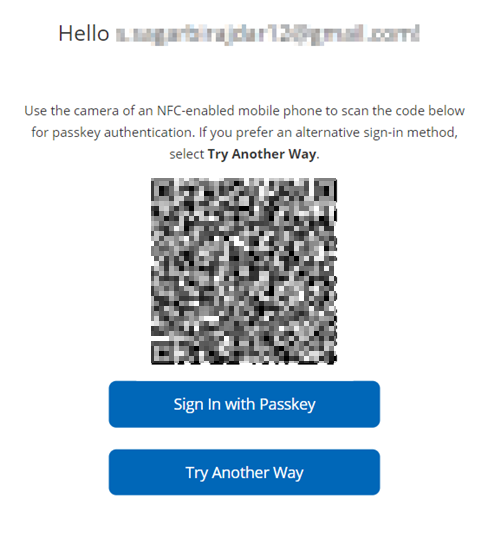
- By default, a QR code is displayed for FIDO2 login via mobile device. Select Sign In with Passkey to choose another mode of login with security keys on the PC. You have the below options to login
Scan a QR Code to Authenticate
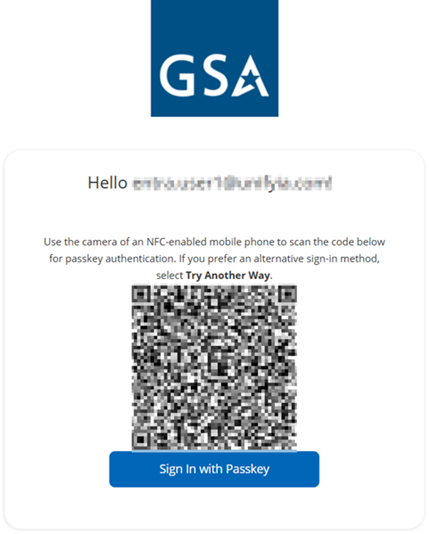
- If your phone camera has the native capacity to scan the QR code, scan the QR code to proceed and authenticate in the browser. You may also use a QR code scanner app to scan the code.
- Hold the smart card/USB security key (passkeys (FIDO2)) flat against the NFC sweet spot (NFC antenna) on your mobile device and enter the PIN when prompted. Hold it until you see the message that the verification is complete.
- You are logged into the relying party application.
Use Security Keys to Authenticate
Depending on the form factor of your passkey (such as an NFC card, smart card, or security key), the method of connecting to your PC may differ, but the authentication process remains similar across all form factors.
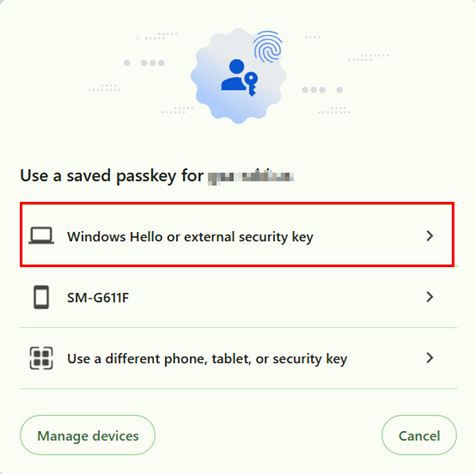
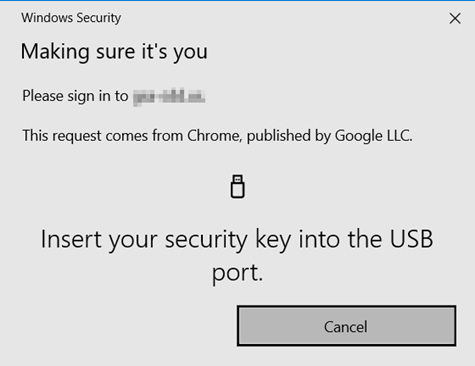
- Select Sign In with Passkey.
- Select Windows Hello or external security key.
- Based on the type of your form factor, continue with one of the following:
- If you are using an NFC-enabled device, connect an external NFC reader to your computer, when prompted, tap the NFC passkey on the reader and enter the security PIN to continue.
- If you are using a USB security key, insert the USB security key into the USB slot of your computer, enter the security key PIN, and when prompted touch the security key to continue.
- If you are using a smart card, connect a card reader to your computer, insert the card into it, and enter the security PIN to continue.
- You are logged into the relying party application.
Authenticate Using the Unifyia ID Wallet Credentials
This section outlines the process for users to authenticate to the relying party application using the issued mobile credentials. Note that the authentication options available may vary depending on the credentials provided to the user. This section assumes that the user has been issued passkeys and digital credentials on the Unifyia ID Wallet app.
Launch the relying party application on a PC. Select to log in using GSA. You are directed to the Unifyia platform Sign In page. You will notice that a QR code is displayed along with two options – Sign in with Passkey and Try Another Way. The following sections detail how to use each one of these options and the digital wallet credentials on the mobile to authenticate.
FIDO2 Credential
This section explains how to use the FIDO2 credentials issued on the ID wallet app to authenticate to a relying party.
Required
- ID wallet app installed on a mobile phone. Credentials must be issued.
- Registered NFC-supported passkeys on the Unifyia ID Wallet.
Steps
- Sign in to the relying party using your email to display the authentication options. A QR code is displayed.
- If your phone camera has the native capacity to scan the QR code, scan the QR code to proceed, tap your NFC-supported passkeys (FIDO2) near the NFC antenna, and enter the set PIN to authenticate. You may also use a QR code scanner app to scan the code.
- You are logged into the relying party application.
PKI Credential
This section explains how to use the PKI credential issued on the ID wallet app to authenticate to a relying party.
Required
ID wallet app installed on a mobile phone. Credentials must be issued.
Steps
- Sign in to the relying party using your email to display the authentication options.
- Select Try Another Way.
- The list of additional authentication options is displayed.
- Select Push Verify with PKI.
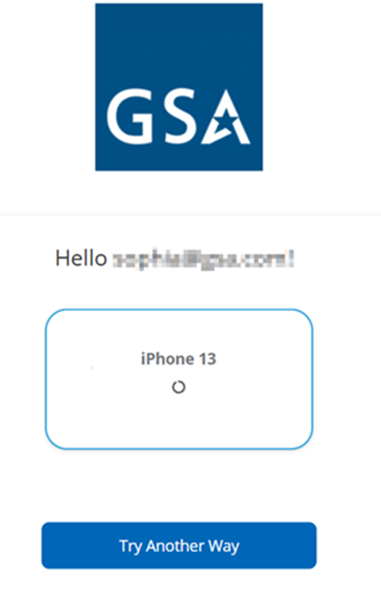
- The registered mobile device is displayed on the page. Select it.
- A notification is sent to the Unifyia ID Wallet. The notification is visible under the mobile device notifications list. Select this notification to proceed. You can also view the approval request under the notifications section on the mobile app. Tap on the approval request to proceed.
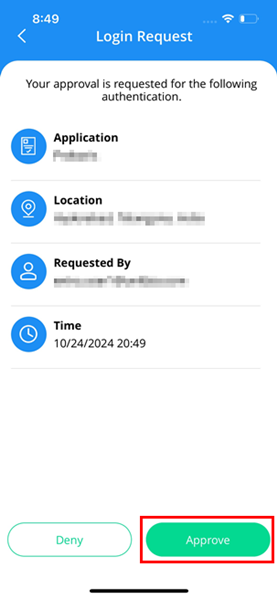
- Depending on your mobile device's settings, you may need to swipe, enter a PIN, password, or pattern, or use biometric authentication (such as fingerprint or facial recognition) to unlock the device. Unlock your device using the set user authentication method. Follow the on-screen instructions or prompts to input the required authentication method. The Login Request approval screen is displayed.
- Select Approve to authenticate.
- The application prompts for the authentication credentials configured to unlock the mobile device. Input the details.
- You are now logged in to the relying party.
- If you select Deny, the sign-in will fail.
Consent Credential - Push Verify
This is a consent-based authentication method. You can only use the Push Verify option if the PKI credentials are not issued in the wallet app. If the PKI credentials are issued, the Push Verify with PKI option will be visible by default. However, the authentication process remains similar to Push Verify with PKI.
Required
ID wallet app installed on a mobile phone. Credentials must be issued.
Steps
- Sign in using your email to display the authentication options.
- Select Try Another Way.
- The list of additional authentication options is displayed.
- Select Push Verify.
- The registered mobile device is displayed on the page. Select it.
- A notification is sent to the Unifyia ID Wallet.
- Check the notifications section on the mobile and tap on it.
- The Login Request approval screen is displayed.
- Tap on the Approve button to authenticate and log in to the relying party application.
- The application prompts for the authentication credentials configured to unlock the mobile device. Input the details.
- You are now logged in to the relying party.
- If you select Deny, the sign-in will fail.


OTP Credential
Required
ID wallet app installed on a mobile phone. Credentials must be issued.
Steps
This is an authentication method that uses time-based one-time passwords (TOTP).
- Sign in using your email to display the authentication options.
- Select Try Another Way.
- The list of additional authentication options is displayed.
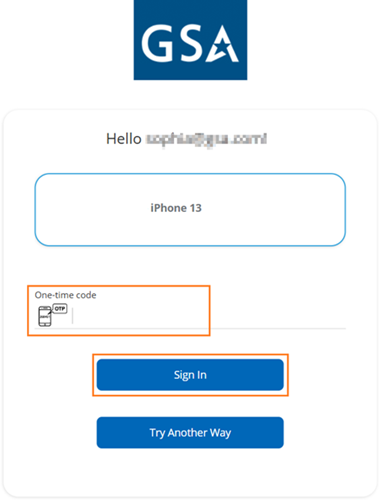
- Select One Time Password.
- Select your mobile device.
- Open the ID Wallet app and tap on OTP.
- Enter the displayed OTP on the platform.
- You are logged into the relying party application.
Granular Lifecycle Management of the Passkeys
Granular lifecycle management ensures precise control over identities and credentials throughout their lifecycle, balancing security, usability, and compliance. It allows organizations to tailor credential management based on roles, risk levels, or specific needs, providing flexibility for changing requirements. Detailed tracking and auditing of credential activities help meet regulatory and security compliance. Fine-grained control enables the identification of dormant or misused credentials and allows selective revocation without fully deactivating accounts. Strict recovery procedures minimize the risk of fraudulent access. By enforcing firm controls at each stage, organizations reduce the risks of unauthorized access, insider threats, and credential compromise.
The platform allows federal agencies and organizations to granularly manage lifecycle actions for identity devices such as smart cards, security keys, mobile devices, applications such as PIV, FIDO2, and issued credentials, for example, PIV authentication certificate, Passkeys (FIDO2), provisioned Passkeys (FIDO2). It allows role-based access to granular lifecycle actions. The lifecycle options are visible based on the status of the identities and credentials.
Operator Lifecycle Actions
This section explains the various lifecycle actions an operator can manage for the identity devices, applications, and issued credentials.
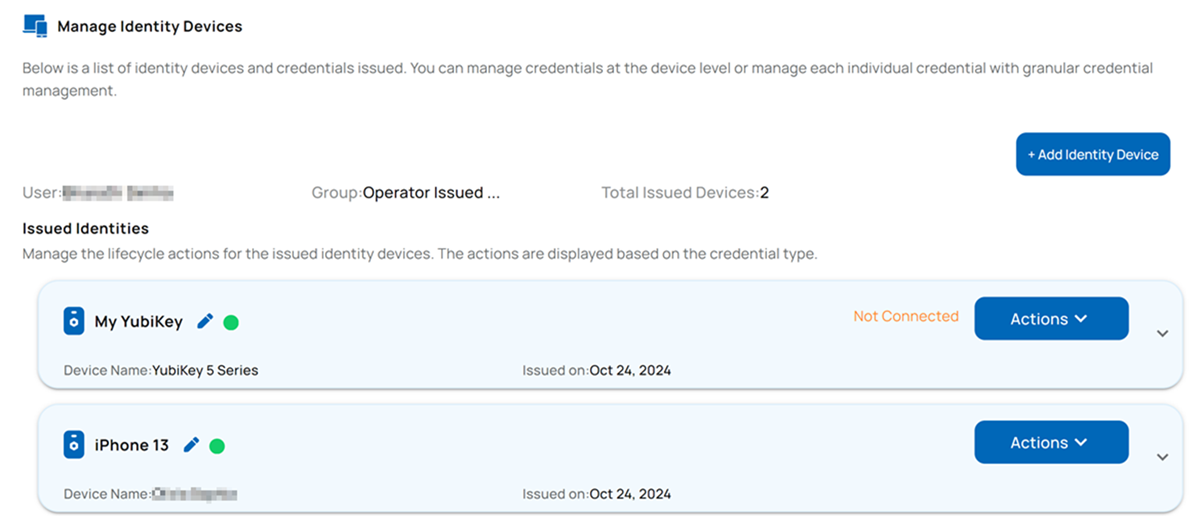
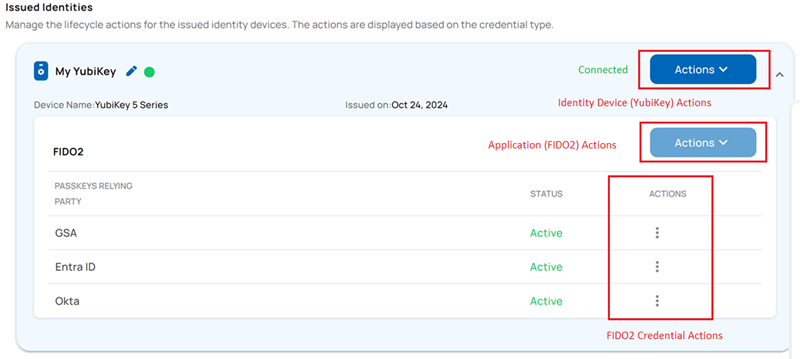
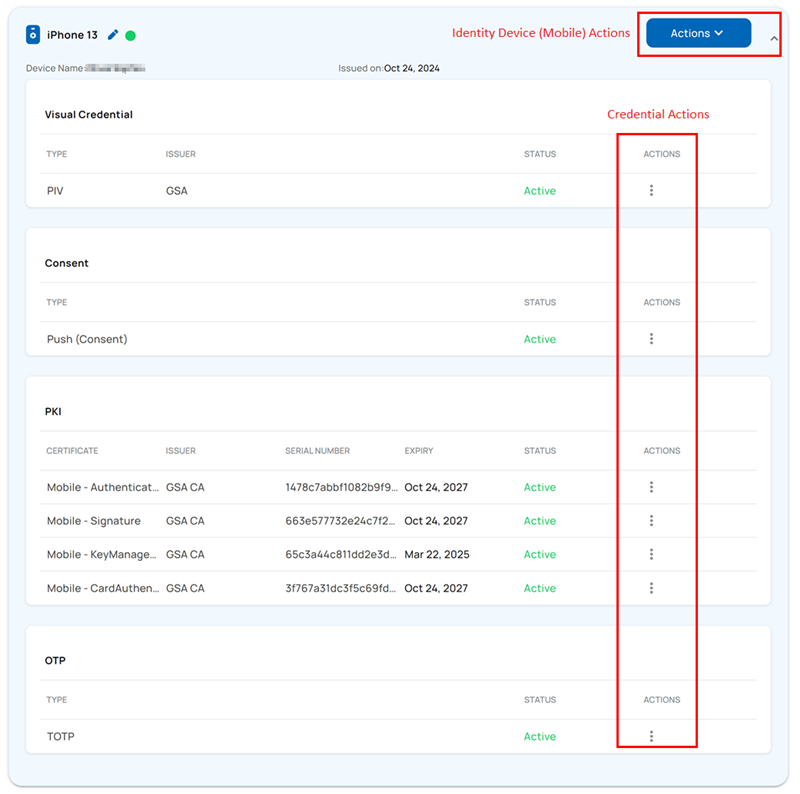
Log into the platform using operator credentials. Navigate to Management > Users. Search the user either by name or email. Under the Actions column, select the Identity Lifecycle icon. All the issued identities are displayed. For each identity, application, and credential, you’ll notice that actions are enabled based on their status. To proceed, select Actions and choose the desired option. Refer to the images below for a detailed view of the granular lifecycle management.
Manage Identity Devices Page
YubiKey, FIDO2 Application, and Credentials Lifecycle
Mobile Device and Credentials Lifecycle
Identity Device Lifecycle Actions
The following are the possible lifecycle actions based on the status of the device for identity devices such as smart cards, security keys, and mobile devices.
| Application | Lifecycle Actions |
|---|---|
| Suspend | When an active device (smart card, security key) is lost/damaged, you can suspend the device to avoid misuse. To suspend the device, select the identity and select Actions > Suspend. Select one of the listed reasons to suspend the device and confirm. |
| Reactivate | To reactivate a suspended device, select the identity, and select Actions > Reactivate. |
| Revoke | When you revoke an identity, the device can no longer be used. Select the identity, and select Actions > Revoke. Provide a reason and revoke the device. |
| Remove | Once the device is revoked, you can remove it if you do not require it to be visible under the issued device list. Select the identity and select Actions > Remove. |
Application Lifecycle Actions
The following are the possible lifecycle actions for the FIDO2 application:
| Application | Lifecycle Actions | Process |
|---|---|---|
| FIDO2 | Reset FIDO PIN |
|
| Delete | Select the application and select Actions > Delete. |
Credential Lifecycle Actions
The table below outlines the credential lifecycle actions available to an operator. For each credential, choose Actions and then select the desired action. For the process, refer to the section Identity Device Lifecycle Actions.
| Credential | Lifecycle Actions |
|---|---|
| FIDO2 | Delete |
| FIDO2 Provisioned | Delete |
Mobile –
|
Suspend, Reactivate, Revoke, Delete |
User Lifecycle Actions
This section explains the various lifecycle actions that a user can manage for identity devices, applications, and issued credentials based on the device’s status.
Log into the platform using user credentials. Select Identities from the left-hand menu. On this page, you can view all the issued identities and their credentials. Refer to the images in the section Operator Lifecycle Actions for a detailed view of the granular lifecycle management.
Identity Device Lifecycle Actions
The following are the possible lifecycle actions based on the status of the device for the identity devices such as smart cards, security keys, and mobile devices:
| Lifecycle Actions | Process |
|---|---|
| Suspend | When an active device (smart card, security key) is lost/damaged, you can suspend the device to avoid misuse. To suspend the device, select the identity and select Actions > Suspend. Select one of the listed reasons to suspend the device and confirm. |
| Reactivate | To reactivate a suspended device, select the identity and select Actions > Reactivate. |
Application Lifecycle Actions
The following are the possible lifecycle actions for the FIDO2 application.
| Application | Lifecycle Actions | Process |
|---|---|---|
| FIDO2 | Change FIDO PIN |
|
Credential Lifecycle Actions
The table below outlines the credential lifecycle actions available to a user. For each credential, choose Actions and then select the desired action. For the process, refer to the section Identity Device Lifecycle Actions.
| Credential | Lifecycle Actions |
|---|---|
| FIDO2 | Delete |
| FIDO2 Provisioned | Delete |
Mobile -
|
Suspend, Reactivate |
Mobile –
|
Suspend, Reactivate, Renew (You can renew the expired mobile certificates, but this option is only available if the certificates are eligible for renewal; otherwise, it is unavailable.) |
Glossary
| Term | Definition |
|---|---|
| CAC | Common Access Card is a smart card issued by the U.S. Department of Defense that serves as an identification card and enables secure access to military systems and facilities. |
| CIV | Commercial Identity Verification (CIV) refers to non-governmental identity verification processes that leverage standards and protocols similar to the federal PIV (Personal Identity Verification) system. |
| Cryptographic Keys | Secure digital codes used to encrypt and decrypt data, ensuring confidentiality, integrity, and authenticity in communication and data storage. |
| CTAP | Client to Authenticator Protocol is a protocol within the FIDO2 standard that allows communication between an external authenticator (such as a security key) and a device for secure authentication. |
| DFC/DFIDO | Derived FIDO Credential, or Derived FIDO2 (DFIDO2) credential, is a FIDO-based credential derived from an original authentication credential such as a PIV ID, typically used for passwordless login on mobile and remote platforms. |
| DPC/DPIV | Derived PIV Credential, also known as Derived Personal Identity Verification (DPIV), is a credential derived from a PIV card, used to authenticate users on mobile devices and other environments where PIV cards cannot be used directly. |
| FIDO | Fast Identity Online is an open standard for passwordless authentication that uses public-key cryptography to secure user credentials, eliminating the need for passwords. |
| IDP | A system or service that creates, manages, and authenticates user identities, enabling them to access services and applications across different platforms using a single set of credentials. |
| Memorandum M-19-17 | It is a directive issued by the Office of Management and Budget (OMB) that outlines federal identity, credential, and access management (ICAM) requirements to strengthen security, improve user experience, and support federal cybersecurity initiatives. |
| MFA | MFA (Multi-Factor Authentication) is a security process that requires two or more independent credentials (factors) for verifying a user's identity, such as something they know (password), something they have (token), and something they are (biometrics). |
| NFC | NFC (Near Field Communication) is a short-range wireless technology that allows devices to exchange information when placed in proximity, commonly used in mobile payments and access control. |
| Authentication Assurance Level 3 (AAL3) | AAL3 is the highest level of assurance defined by NIST that requires multi-factor authentication using hardware-based authenticators and stringent security measures to prevent unauthorized access. |
| NIST Special Publication (SP) 800-157-r1 | A publication from the National Institute of Standards and Technology (NIST) that provides guidelines for implementing Derived Personal Identity Verification (DPIV) credentials on mobile devices. |
| NIST SP 800-63-4 Digital Identity Guidelines | A NIST publication that offers guidelines for managing digital identities, including identity proofing, authentication, and federation, to help organizations manage risk. |
| NIST FIPS 201-3 | The Federal Information Processing Standard (FIPS) 201-3 defines the requirements for a federal Personal Identity Verification (PIV) system used to verify and authenticate individuals for secure access to federal systems. |
| NIST FIPS 140-2, FIPS 140-3 | FIPS 140-3 replaces the earlier FIPS 140-2 standard. The NIST standard specifies security requirements for cryptographic modules used to protect sensitive information. FIPS 140-3 is aligned with ISO/IEC 19790:2012, an international standard for cryptographic modules, ensuring broader compatibility and global recognition. |
| OAuth | An open standard for authorization, allowing third-party services to access user information from an online service without sharing passwords. FIPS 140-3 is aligned with ISO/IEC 19790:2012, an international standard for cryptographic modules, ensuring broader compatibility and global recognition. |
| OIDC | OpenID Connect (OIDC) is an identity layer built on top of the OAuth 2.0 protocol, enabling secure user authentication and providing user identity information as a token. |
| OMB | Office of Management and Budget (OMB) is a U.S. federal office that assists the President in overseeing the preparation and implementation of the federal budget, along with setting government-wide policies for administrative management, including IT and cybersecurity. |
| PIN | Personal Identification Number is a numeric code used as a security measure to verify a user's identity, often required in conjunction with a smart card or other authentication methods for secure access to systems or services. |
| PIV | Personal Identity Verification is a U.S. government smart card used to securely authenticate federal employees and contractors based on Public Key Infrastructure (PKI). |
| PKI | Public Key Infrastructure (PKI): A framework that manages digital certificates and encryption keys, enabling secure communications and authentication by binding public keys to identities through a trusted certificate authority (CA). |
| Relying party | An application or service that relies on an identity provider (IDP) to authenticate users and grant them access. It is often part of an authentication framework like OAuth or FIDO. |
| SAML | SAML (Security Assertion Markup Language) is a protocol that allows for the secure exchange of authentication and authorization information between parties, typically used for single sign-on (SSO) between identity providers and service providers. |
| SCIM | SCIM (System for Cross-domain Identity Management) is a protocol to facilitate automated user identity management in cloud-based applications by standardizing user provisioning and deprovisioning processes. |
| SSO | SSO (Single Sign-On) is a user authentication process that allows users to log in once and gain access to multiple related but independent software systems without being prompted to log in again. |
| User provisioning | Creating, managing, and maintaining user accounts and access permissions within an organization's IT systems. |
| WebAuthn | A web authentication standard part of the FIDO2 framework, enabling passwordless, secure authentication using public-key cryptography through web browsers. |

